I picked it up as a recommendation from The Programmer’s Brain by Felienne Hermans. It is an odd little book, something like A6 format with 66 pages containing a short paragraph or two on the behaviours of experts in software design. Each page dedicated to a single thought. There are sketches scattered liberally though the book by Yen Quach who is credited in the author biographies.
Although it does not have a contents page or index, Software Design Decoded is divided into “chapters”:
Experts keep it simple
Experts collaborate
Experts borrow
Experts break rules
Experts sketch
Experts work with uncertainty
Experts are not afraid
Experts iterate
Experts test
Experts reflect
Experts keep going
I found this book reassuring as much as anything, and it also gave me some things to think about. Reassuring because it turns out I share habits with expert in software design, which must be a start to being an expert! I write quite a lot of software (for data analysis and data builds) but design tends to come as an afterthought.
I think the things I already do are to build something even if it isn’t the final form, I was interested in the comment about avoiding over-generalisation. The element I am missing here is to learn from this initial form and build something better (potentially discarding what I’ve already done). I also do a fair bit of testing, although in this book testing is wider than just software unit tests or even integration tests, it is about testing preconceptions and testing with the user.
I also liked the comment on focusing on the needs of the key stakeholders where the key stakeholders are the end users, this is a recurring theme – that the end users are the key focus, and them using the product/software are when the job is done.
Always learning gets a recommendation as well as not being afraid to use things in manners other than that intended.
I was interested to note the comments on experts forever sketching since it is something I scarcely do, sometimes a write sequences of tricky bits of code with the odd arrow. I remember learning how to draw flow charts in the late seventies but rarely use the skill (certainly not with all the proper symbols). Software Design Decoded is slightly contradictory on this, in one place experts sketch abstractly as an aid to thought with the sketches meaningless beyond the moment, and in another the sketches are kept for reference later and hence clear and well-labelled.
Notation also gets a couple of mentioned, I take this as a formalised system for naming things – something popular with physicists where the right notation is the difference between a page of formulae and a single line. I’m not really aware of using this in my own practice. Despite repeated attempts at object-oriented design I still tend to be quite “procedural”.
I’m still in the “learning” phase of collaboration, for the first time in a while I’m working on code with other people (and it is a bit of a shock for all concerned), I still can’t abide by meetings but the experts can’t abide some of them (the ones with no direction).
I found this a bit of a “feel good” book, I share at least some of the habits of software design experts! I probably wouldn’t buy it for a personal read but if you have a coffee table in your software company this book would fit right in.
This blog post is designed to clarify my thinking around installing Python packages and the use of setup.py, setup.cfg and pyproject.toml files. Hopefully it will be a useful reference for other people, and future me.
It is stimulated by my starting work on a new project where we have been discussing best practices in Python programming, and how to layout a git repository containing Python code. More broadly it is relevant to me as someone who programmes a lot in Python, mainly for my own local use, but increasingly for other people to consume my code. Prior to writing this the layout of my Python repositories was by a system of random inheritance dating back a number of years.
The subject of Python packaging, installation and publication is a bit complicated for mainly historic reasons – the original distutils module was created over 20 years ago. A suite of tools have grown up either as part of the standard library or de facto standards, and have evolved over time. Some elements are contentious in the sense that projects will have lengthy arguments over whether or not to support a particular method of configuration. A further complication for people whose main business is not distributing their code is that it isn’t necessarily at the start of a project and may never be relevant.
Update: I have updated this blog post 5th May 2023, the change is that project settings formerly in setup.cfg can now go in pyproject.toml, as per PEP-621 – described in more detail in the PyPA documentation. Currently I only use setup.cfg for flake8 configuration. A reader from Mastodon commented that setup.py is not required for installation of a package but is required for build/publication.
tl;dr
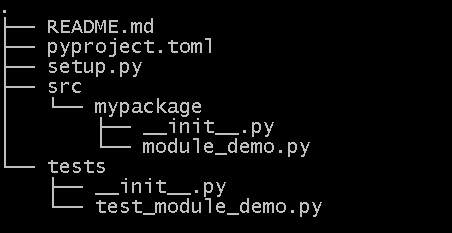
Structure your Python project like this with setup.py and pyproject.toml in the top level with a tests directory and a src directory with a package subdirectory inside that:
The minimal setup.py file simply contains an invocation of the setuptools setup function, if you do not intend to publish your project then no setup.py file is required at all, pip install -e . will work without it:
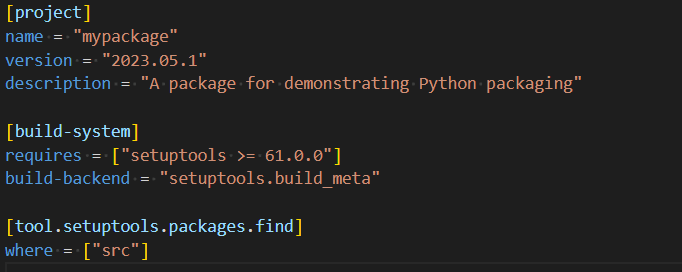
Setup.cfg is no longer required for configuring a package but third-party tools may still use it. Put at least this in pyproject.toml:
Then install the project locally:
pip install -e .
If you don’t do this “editable installation” then your tests won’t run because the package will not be installed. An editable install means that changes in the code will be immediately reflected in the functionality of the package.
It is common and recommended practice to use virtual environments for work in Python. I use the Anaconda distribution of Python in which we setup and activate a virtual environment using the following, to be run before the pip install statement
But why should we do it this way? It is worth stepping back a bit and defining a couple of terms:
module – a module is a file containing Python functions.
package – a package is a collection of modules intended to be installed and used together.
Basically this blog post is all about making sure import and from ... import ... works in a set of distinct use cases. Possibilities include:
Coding to solve an immediate problem with no use outside of the current directory anticipated – in this case we don’t need to worry about pyproject.toml, setup.cfg, setup.py or even __init__.py.
Coding to solve an immediate problem with the potentially to spread code over several files and directories – we should now make sure we put an empty __init__.py in each directory containing module files.
Coding to provide a local library to reuse in other projects locally this will require us to run python setup.py develop or better pip install -e .
Coding to provide a library which will be used on other systems you control again using pip install -e .
Coding to provide a library which will be published publicly, here we will need to additionally make use of something like the packaging library.
I am primarily interested in cases 3 and 4, and my projects tend to be pure Python so I don’t need to worry about compiling code. More recently I have been publishing packages to a private PyPI repository but that is a subject for another blog post.
The setup.py and setup.cfg files are artefacts of the setuptools module which is designed to help with the packaging process. It is used by pip whose purpose is to install a package either locally or remotely. If we do not configure setup.py/setup.cfg correctly then pip will not work. In the past we would have written a setup.py file which contained a bunch of configuration information but now we should put that configuration information into setup.cfg which is effectively an ini format file (i.e. does not need to be executed to be read). This is why we now have the minimal setup.py file.
It is worth noting that setup.cfg is an ini format file, and pyproject.toml is a slightly more formal ini-like format.
What is pyproject.toml?
The pyproject.toml file was introduced in PEP-518 (2016) as a way of separating configuration of the build system from a specific, optional library (setuptools) and also enabling setuptools to install itself without already being installed. Subsequently PEP-621 (2020) introduces the idea that the pyproject.toml file be used for wider project configuration and PEP-660 (2021) proposes finally doing away with the need for setup.py for editable installation using pip.
Although it is a relatively new innovation, there are a number of projects that support the use of pyproject.toml for configuration including black, pylint and mypy. More are listed here:
Tests go in a tests directory at the top-level of the project with an __init__.py file so they are discoverable by applications like pytest. The alternative of placing them inside the src/mypackage directory means they will get deployed into production which may not be desirable.
Why put your package code in a src/ subdirectory?
Using a src directory ensures that you must install a package to test it, so as your users would do. Also it prevents tools like pytest incidently importing it.
Conclusions
I found it a useful exercise researching this blog post, the initial setup of a Python project is something I rarely consider and have previously done by rote. Now I have a clear understanding of what I’m doing, and I also understand the layout of Python projects. One of my key realisations is that this is a moving target, what was standard practice a few years ago is no longer standard, and in a few years time things will have changed again.
I picked up The Programmer’s Brain by Felienne Hermans, as a result of a thread on Twitter. I’ve been following Hermans for quite a while, and knew the areas of computer science she worked in but my interest in Programmer’s Brain was stimulated by a lengthy thread she posted over the Christmas break.
The book is based around the idea of the brain as having long term (LTM), short term (STM) and working memory and how these different sorts of memory come into play in programming tasks, how we can improve our memories, and how we can write code that supports our use of them. It cites a fair number academic studies in each area it looks at.
The book is divided into four parts.
The first part covers the reading of code. We do a lot of training on how to write code but none on reading it, yet as developers we spend a lot of time reading code, either our own code from the past, the code of our colleagues or library code.
Perhaps most traumatic for me was the suggestion that I should learn syntax. Hermans suggests flash cards to learn syntax, as an aid to reading code (and writing it), highlighting that going and looking up syntax is likely to break our flow, by the time we have checked out twitter and some pictures of kittens. Thinking about my own behaviour, this is definitely true. My first flash cards would all be around Python – set syntax, format statements, unittests boilerplate and the options for sort and sorted.
An idea I hadn’t come across before was refactoring code for readability which may be at odds with how code currently stands; you might, for example, inline functions to remove the need to go look them up and potentially lose your place in code. Or replace lambdas, list comprehensions or ternary operators – all of which take a bit more effort to parse – with their more verbose, conventional alternatives.
Two things that aid reading code are “chunking”, experts in a field, like chess or programming, don’t learn remember every detail but they know the rules of possibility so they can break up a programme or a chess position into larger pieces (or chunks). They thus have better recall than novices.
The second aid to reading code are beacons, variable names and comments that hint about the higher purpose of code, to enable you to recall the right chunks. That’s to say if you are implementing code that uses a binary try you use the conventional names of root, branch, node, left and right rather than trying to be individualistic.
I suspect a lot of programmers, like me, will be looking at the rote learning exercises that Hermans proposes and starts to think immediately about how to automate them! I think there is scope for IDE extensions that allow you set up some flashcards or little code exercises. Also Hermans proposes quite a lot of printing out code and annotating it, again this was something I’d quite like IDE support for.
The second part is on understanding code more deeply, how it works. I was interested to learn that our natural language abilities are a better predictor of how good we are at comprehending what code does, than our mathematical abilities. In terms of understanding code, Hermans talks about marking up listings of code to highlight the occurrence of functions and variables. And, furthermore, to label variables by role following the work of Sajaniemi that is to say into the categories of fixed value, stepper, flag, walker (like a stepper), most recent holder, most wanted holder, gatherer, container, follower, organiser, and temporary. The co-occurrence of these roles provides strong clues as to what code does – in the same manner as design patterns. If we spot a design pattern we can access our long term memory as to what a design pattern does.
Following on from the idea of labelling roles of variables is the somewhat depreciated “Hungarian notation” proposed by Simonyi. This is where you include some type or role information in a variable name such as “strMyName” or “lb_textbox”, Simonyi’s original proposal was to name variables with their roles, rather than just their types which is rather less useful in strongly typed languages and modern IDEs with syntax highlighting.
The third part is on writing code, starting with the importance of naming things. The key here is consistency in naming (i.e. stick with either snake case or camel case, don’t mix), and agreeing a “name mould” – a pattern for compiling parts of a name. Martin Fowler’s “code smells” are also covered in this section, highlighting how they interact with the model and how bad code smells prevent us accessing our long term memories.
The final part is on collaborating on code, including the developer’s great bugbear “the interruption”, it turns out this annoyance is well-founded with research showing that an interruption typically requires 15-20 minutes for recovery. I was also interested to see that we are not very good at multi-tasking, although we might think we are.
Also in this part is a discussion of the cognitive dimensions of code bases (CDCB), these are ideas like the error proneness of code, how easy it is to modify, how easy it is to test in parts applied at the level of an application or library. There is an implication here that the language you use to build a library may change over the course of time, perhaps starting with Python when you are roughing things out quickly, adding in type hinting when the library is more mature and shifting to Scala or Java when the design is stable and better performance is needed.
Finally, there is a small piece on onboarding new developers to a project, here the ideas of cognitive load repeat. Often when we are onboarding a new developer we show them the code, introduce a load of people, draw diagrams and so forth – all very fast. Under these circumstances our ideas about cognitive load tell us anyone will be overwhelmed.
I enjoyed this book, it feels like a guide to getting better at doing something I spend a lot of my time on. It is an area, learning in the field of programming, that I have not seen written about elsewhere.
Hopefully this book will change the way I work a bit, I’ll try to learn more syntax, I’ll not worry about reusing the same variable names, or even using Hungarian notation. I’ll try to remember the roles of variables. And I’ll try Hedy out with my son, Hedy is the teaching language Hermans wrote while also writing this book.
I’ve been working on a proof of concept project at work, and the time has come to convert it into a production system. One of the things it was lacking was documentation, principally for the developers who would continue work on it. For software projects there is a solution to this type of problem: automated documentation systems which take the structure of the code and the comments in it (written in a particular way) and generate human readable documentation from it – typically in the form of webpages.
For Python the “go to” tool in this domain is Sphinx.
I used Sphinx a few years ago, and although I got to where I wanted in terms of the documentation it felt like a painful process. This time around I progressed much more quickly and was happier with the results. This blog post is an attempt to summarise what I did for the benefit of others (including future me). Slightly perversely, although I use a Windows 10 laptop, I use Git Bash as my command prompt but I believe everything here will apply regardless of environment.
There are any number of Sphinx guides and tutorials around, I used this one by Sam Nicholls as a basis supplemented with a lot of Googling for answers to more esoteric questions. My aim here is to introduce some pragmatic solutions to features I wanted, and to clarify some thing that might seem odd if you are holding the wrong concept of how Sphinx works in your head.
I was working on a pre-existing project. To make all of the following work I ran “pip install …” for the following libraries: sphinx, sphinx-rtd-theme, sphinx-autodoc-typehints, and m2r2. In real life these additional libraries were added progressively. sphinx-rtd-theme gives me the the popular “Readthedocs” theme, Readthedocs is a site that publishes documentation and the linked example shows what can be achieved with Sphinx. sphinx-autodoc-typehints pulls in type-hints from the code (I talked about these in another blog post) and m2r2 allows the import of Markdown (md) format files, Sphinx uses reStructuredText (rst) format by default. These are both simple formats that are designed to translate easily into HTML format which is a pain to edit manually.
With these preliminaries done the next step is to create a “docs” subdirectory in the top level of your repository and run the “sphinx-quickstart” script from the commandline. This will ask you a bunch of questions, you can usually accept the default or provide an obvious answer. The only exception to this, to my mind, is when asked “Separate source and build directories“, you should answer “yes“. When this process finishes sphinx-quickstart will have generated a couple of directories beneath “docs“: “source” and “build“. The build directory is empty, the source directory contains a conf.py file which contains all the configuration information you just provided, an index.rst file and a Makefile. I show the full directory structure of the repository further down this post.
I made minor changes to conf.py, switching the theme with html_theme = ‘sphinx_rtd_theme’, and adding the extensions I’m using:
In the past I added these lines to conf.py but as of 2022-12-26 this seems not to be necessary:
import os
import sys
sys.path.insert(0, os.path.abspath('..'))
This allows the Sphinx to “see” the rest of your repository from the docs directory.
The documentation can now be built using the “make html” command but it will be a bit dull.
In order to generate the documentation from code a command like: “sphinx-apidoc -o source/ ../project_code“, run from the docs directory will generate .rst files in the source directory which reflect the code you have. To do this Sphinx imports your code, and it will use the presence of the __init__.py file to discover which directories to import. It is happy to import subdirectories of the main module as submodules. These will go into files of the form module.submodule.rst.
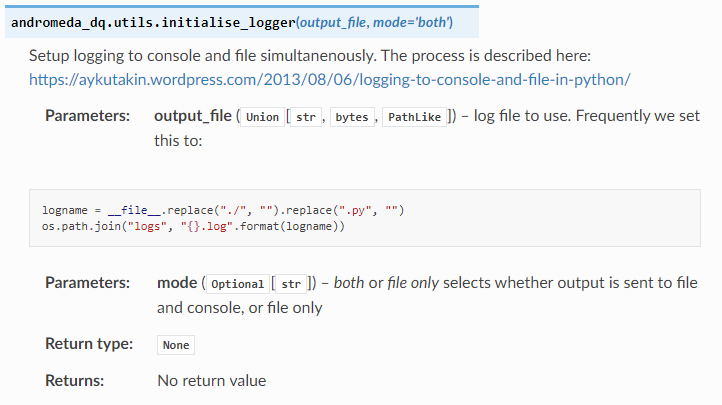
The rst files contain information from the docstrings in your code files, (those comments enclosed in triple double-quotes “””I’m a docstring”””. A module or submodule will get the comments from the __init__.py file as an overview then for each code file the comments at the top of the file are included. Finally, each function gets an entry based on its definition and some specially formatted documentation comments. If you use type-hinting, the sphinx-autodoc-typehints library will include that information in documentation. The following fragment shows most of the different types of annotation I am using in docstrings.
def initialise_logger(output_file:Union[str, bytes, os.PathLike], mode:Optional[str]="both")->None:
    """
    Setup logging to console and file simultanenously. The process is described here:
    Logging to Console and File In Python

    :param output_file: log file to use. Frequently we set this to:
    .. highlight:: python
    .. code-block:: python

            logname = __file__.replace("./", "").replace(".py", "")
            os.path.join("logs", "{}.log".format(logname))

    :param mode: `both` or `file only` selects whether output is sent to file and console, or file only

    :return: No return value
    """
My main complaint regarding the formatting of these docstrings is that reStructuredText (and I suspect all flavours of Markdown) are very sensitive to whitespace in a manner I don’t really understand. Sphinx can support other flavours of docstring but I quite like this default. The docstring above, when it is rendered, looks like this:
In common with many developers my first level of documentation is a set of markdown files in the top level of my repository. It is possible to include these into the Sphinx documentation with a little work. The two issues that need to be addressed is that commonly such files are written in Markdown rather reStructuredText. These can be fixed by using the m2r2 library. Secondly the top level of a repository is outside the Sphinx source tree, so you need to put rst files in the source directory which include the Markdown files from the root of the repository. For the CONTRIBUTIONS.md file the contributions.rst file looks like this:
.. mdinclude:: ../../CONTRIBUTIONS.md
Putting this all together the (edited) structure for my project looks like the following, I’ve included the top-level of the repository which contains the Markdown flavour files, the docs directory, where all the Sphinx material lives, and stubs to the directories containing the module code, with __init__.py files.
The index.rst file pulls together documentation in other rst files, these are referenced by their name excluded the rst extension (so myproject pulls in a link to myproject.rst). By default the index file does not pull in all of the rst files generated by apidoc, so these might need to be added (specifically the modules.rst file). The index.rst file for my project looks like this, all I have done manually to this file is add in overview, installation, usage, contributions and modules in the “toctree” section. Note that the indentation for these file imports needs to be the same as for the preceding :caption: directive.
.. Andromeda Data Quality documentation master file, created by
   sphinx-quickstart on Wed Sep 15 08:33:59 2021.
   You can adapt this file completely to your liking, but it should at least
   contain the root `toctree` directive.

Andromeda Data Quality
======================

Documentation built using Sphinx. To re-build run `make html` in the `docs`
directory of the project.

The OVERVIEW.md, INSTALLATION.md, USAGE.md, and CONTRIBUTIONS.md files are imported
from the top level of the repo.

Most documentation is from type-hinting and docstrings in source files.

.. toctree::
   :maxdepth: 3
   :caption: Contents:

   overview
   installation
   usage
   contributions
   modules


Indices and tables
==================

* :ref:`genindex`
* :ref:`modindex`
* :ref:`search`
The (edited) HTML index page for the documentation looks like this:
For some reason Sphinx puts the text in the __init__.py files which it describes as “Module Contents” at the bottom of the relevant package description, this can be fixed by manually moving the “Module contents” section to the top of the file in the relevant package rst file.
There is a little bit of support for Sphinx in Visual Code, I’ve installed the reStructuredText Syntax highlighting extension and the Python Sphinx Highlighter extension. The one thing I haven’t managed to do is automate the process of running “make html” either on commit of new code, or when code is pushed to a remote. I suspect this will be one of the drawbacks in using Sphinx. I’m getting a bit better at adding type-hinting and docstrings as I code now.
If you have any comments, or suggestions, or find any errors in this blog post feel free to contact me on twitter (@ianhopkinson_).
My next review is on Data Pipelines with Apache Airflow by Bas P Harenslak and Julian R De Ruiter. The book was published in 2021, and is compatible with Airflow 2.0 which was released at the end of 2020.
Airflow is all about orchestrating the movement of data from sources such as APIs and so forth into other places, it originated in Airbnb. It is designed for batch processing, rather than streaming data, and for pipelines that do not change much.
Data pipelines in Airflow are represented as “directed acyclic graphs” or DAGs which are defined in Python code using “Operators” which carry out tasks. A graph is a collection of nodes (tasks in this case) with “edges” between them. The “directed acyclic” bit means tasks have a definite order, the edges between them are “directed”, and the graph cannot have loops or cycles because that would imply having to finish a set of tasks before you could start them. Simple data pipelines would just be a linear set of tasks that always follow one from another, a more complicated pipeline might bring in data from several sources before combining them to produce a final data product.
The Operators are strung together using expressions of the form “operator 1 >> operator 2” or even “[operator 1, operator 2] >> operator 3”.
Operators do not have to use Python, they can invoke code in other languages such as the BashOperator, or interact with other systems such as databases or storage systems such as S3. It is relatively easy to write your own operators. Alongside operators that do stuff there are branch operators which select one or other path in the DAG, and there are also sensors which detect changes in filesystems and trigger work and hooks which form connections with external services. Dummy operators can be used to simplify the appearance of DAGs.
As an orchestration system the intention of operators is that they should not contain a great deal of code to process data, that function should be off-loaded to libraries or systems elsehwhere.
The Airflow system is comprised of a web server which allows you to observe / trigger execution of DAGs, a scheduler which is responsible for the scheduled running of DAGs and workers which do the actual work of the DAG. The Airflow system loops over the tasks defined in a DAG, and tries to execute tasks which depends on the tasks upstream of the task in question, if they have been successfully completed then a task can execute.
A basic implementation runs DAGs locally using a simple queue to schedule work, and a sqlite database to store metadata. A production implementation would use something like Postgres or Amazon RDS as the metadata store, schedule work using Celery and run tasks in Docker containers marshalled using Kubernetes.
For some reason reading this I was reminded that big projects like Airflow are just other people’s code, and if you look too carefully you’ll find something nasty. This is both comforting and mildly scary. I think the issue was that Airflow uses jinja templating to inject parameters into code which feels wrong but is probably a pragmatic and safe why to do it, these shenanigans are not required for Python operators. Also discussed are issues with code dependencies, which the authors suggest are best eliminated by putting operators into Docker containers each of which contain their own code dependencies – allowing otherwise dependency incompatible libraries to work together.
Alongside the material on Airflow there are moderate chunks on Python modules, testing, Docker and Kubernetes and logging so you get a well rounded view not only of Airflow but also of the ecosystem it sits in. The book finishes with deployment into various Cloud environments. I found these parts quite useful since the most complicated work I do in my role is trying to get things to work in AWS! The data science part is easy…
The book finishes with some short chapters on Cloud deployments, mentioning first fully managed services such as astronomer.io, Amazon MWAA and Google Cloud Composer before going on to talking about implementation of one of the demos in the book on AWS, Azure and Google cloud services. I considered skipping these chapters but they turned out be quite interesting in highlighting the differences between services and perhaps the preferences of the authors of both the book and of Airflow.
I found this a readable introduction to Airflow with some nice examples, and interesting additional material. Useful if you are thinking about using Airflow, or even if you are working on data pipelines without Airflow since it provides a good description of the moving parts required.

 Software Design Decoded: 66 Ways Experts Think by Marian Petre and André van der Hoek is my next read.