This post introduces the hdx-cli-toolkit – a tool written in Python to examine and update metadata in the Humanitarian Data Exchange (HDX) which is based on the CKAN data catalogue.
HDX is a project of the UN Office for the Coordination of Humanitarian Affairs (UNOCHA). It is a data catalogue focussed on sharing data relevant to relief efforts. The data come from a wide range of providers who can upload data and the related metadata either manually or using automated pipelines. A team at the Centre for Humanitarian Data manage HDX: approaching providers for new data, working on data quality, enhancing HDX, and writing pipelines to automatically add data. I was involved at the start of the HDX project in 2014.
The hdx-cli-toolkit grew out of my recent time as a consultant on a return to the HDX project. The team I was in received numerous internal queries relating to metadata on HDX that couldn’t easily be answered by using the HDX user interface or CKAN API but were amenable to solution using relatively small pieces of Python code. Rather than scatter around small pieces of one-off code I decided to write a command-line tool to collect together this code and make it re-useable by others.
As an aside, my post on understanding Python project setup is the most popular one I have written by a large margin.
Overview
hdx-cli-toolkit supports the following commands:
configuration – Print configuration information to terminal
download – Download dataset resources (files) from HDX
get_organization_metadata – Get an organization id and other metadata
get_user_metadata – Get user id and other metadata
list – List datasets in HDX
print – Print datasets in HDX to the terminal
quickcharts – Upload QuickChart JSON description to HDX
remove_extras_key – Remove extras key from a dataset
scan – Scan all of HDX and perform an action
showcase – Upload showcase to HDX
update – Update datasets in HDX
update_resource – Update a resource in HDX
Installation
hdx-cli-toolkit is a Python application published to the PyPI package repository. It can be installed easily with:
pip install hdx_cli_toolkit
Users may prefer to make a global, isolated installation using pipx which will make the hdx-cli-toolkit commands available across all of their projects:
pipx install hdx_cli_toolkit
hdx-cli-toolkit can then be updated with:
pipx install --force hdx_cli_toolkit
hdx-cli-toolkit uses the hdx-python-api library, this requires the following to be added to a file called .hdx_configuration.yaml in the user’s home directory.
hdx_key_stage: "[an HDX API token from the staging HDX site]"
hdx_key: "[an HDX API token from the prod HDX site]"
default_organization: "[your organization]"
The default_organization is required for the configuration command and can be supplied using the --organization= command-line parameter. If not defined it will default to hdx.
A user agent (hdx_cli_toolkit_*) is specified in the ~/.useragents.yaml file with the * replaced with the user’s initials.
Details of the currently implemented commands can be revealed by running hdx-toolkit --help, and details of the arguments for a command can be found using hdx-toolkit [COMMAND] --help
A couple of simple invocations, this first one prints out all the metadata for a dataset in a readable JSON format:
This one shows the value of a particular metadata element for a set of datasets. The list command works in conjunction with the update command in which case the --value option provides the value to update to:
hdx-toolkit list --organization=healthsites --dataset_filter=*al*-healthsites --hdx_site=stage --key=private --value=True
A detailed guide including many example invocations can be found in the USERGUIDE.md file
Application Programming Interfaces (APIs) are a standard way for computers to communicate with each other. In this article I am going to show how to use Power Query to access data sources on the web via APIs. Power Query is a feature available in versions of the Excel desktop app after 2016 and in the online version of Excel in Microsoft 365, as well as Power BI.
I will use the HDX Humanitarian API (HDX HAPI) as an example data source but the methods described here are general. HDX HAPI is a system for accessing humanitarian data hosted by the UN Office for the Coordination of Humanitarian Aid (UNOCHA), it is a project I first worked on at its foundation 10 years ago.
This tutorial shows how to access the data in HDX HAPI using the Excel “point and click” interface, and then by editing the text of the query in the Power Query Advanced Editor which allows more complex processing of the data – including paging data in an API until it has all been downloaded.
Opening a JSON file from the web
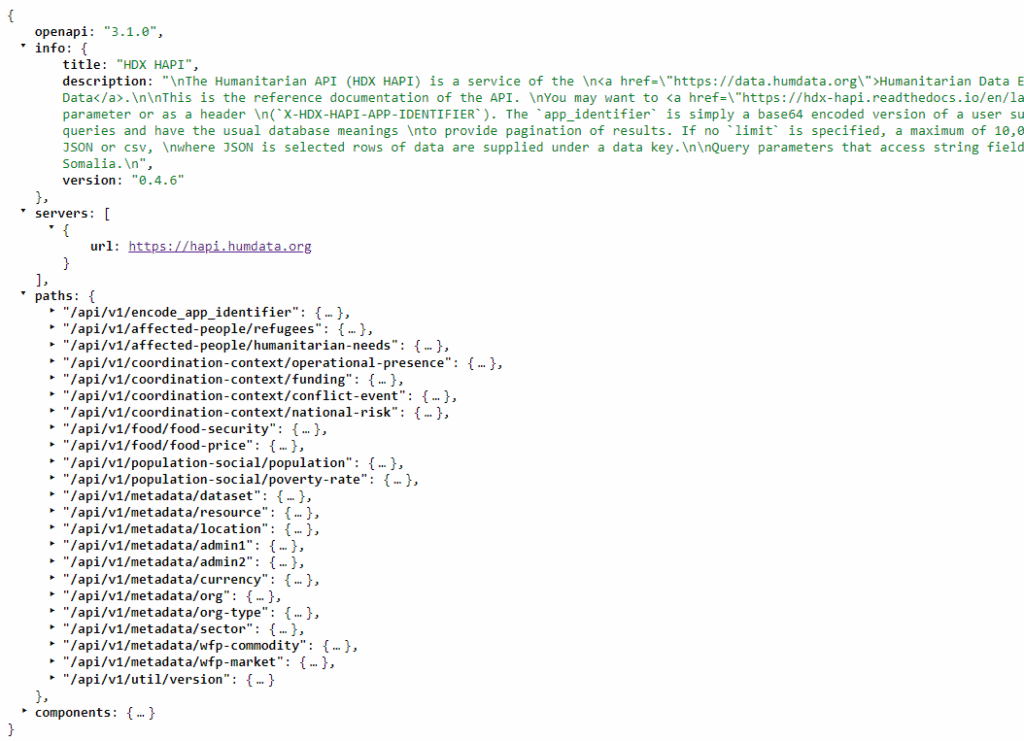
The simplest data we can access from HDX HAPI is the machine-readable description of the API, including the available endpoints, which is found in a file at https://hapi.humdata.org/openapi.json. We start with this because we don’t have to worry about authorization or building a complex query URL, so we can focus on the process in Excel Power Query. The file we are reading is in JSON format and looks like this in the browser:
This is a simplified view, there is further information including a summary and description for each path in the paths section which we have hidden.
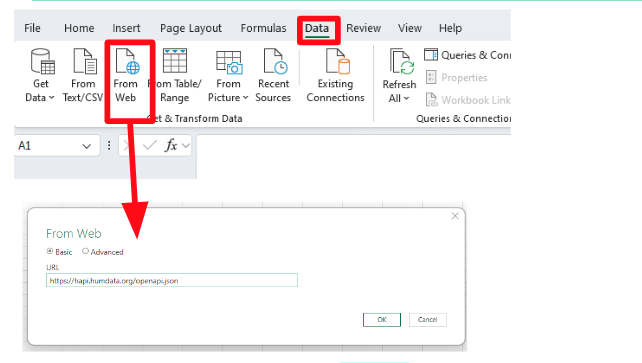
To open this file in Power Query we go to the Data tab in Excel and click the From Web button. This pops up a From Web dialog box with a space to add a URL – so we paste our URL in there and click “OK”.
This brings up the Power Query Editor and shows us this data:
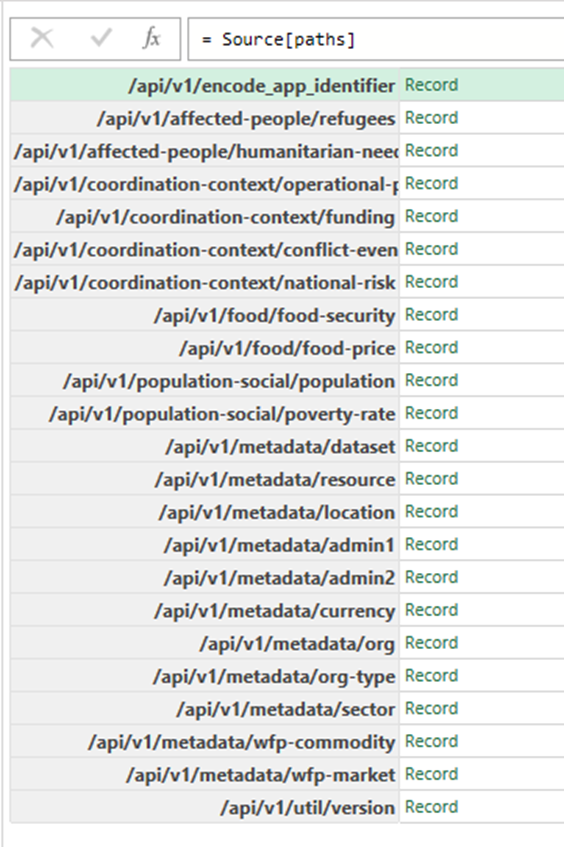
We are interested in the paths section because that lists the different datasets in the API. If we click on the green record next to paths then we see a list of the endpoints:
We can pull them into an Excel spreadsheet by clicking Into Table and then Close & Load buttons. This gives us a list of the available endpoints in an Excel table.
Using an API with Power Query
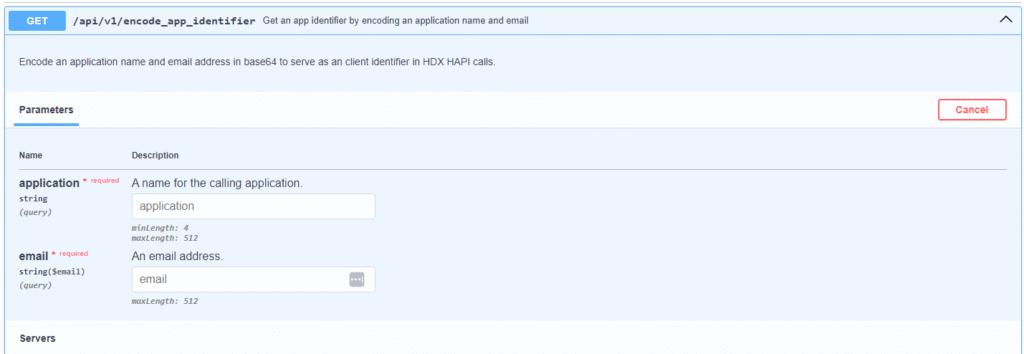
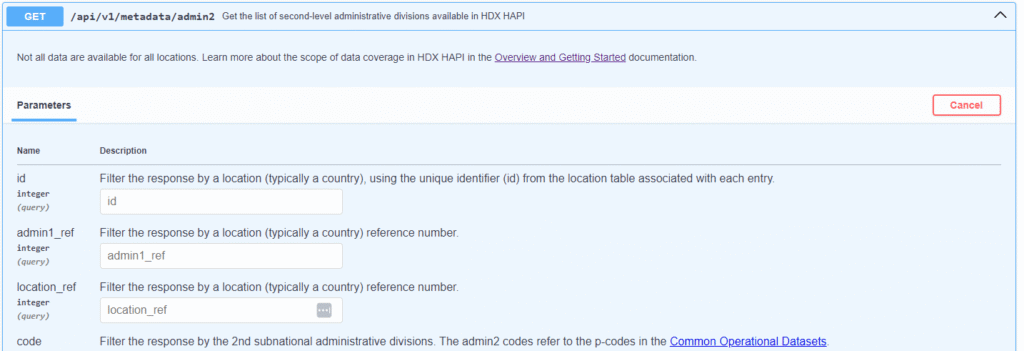
Next we will load data from one of the HDX HAPI endpoints using Power Query. We’ll use the metadata/admin2 endpoint which contains a table of data about geographic administrative areas. We start by visiting the HDX HAPI API documentation page (https://hapi.humdata.org/docs#) which allows us to try out queries to the API, the output of this process is a query URL which contains all the information we need to make a query to the API.
The next step is to design a query for the dataset we are interested in, remembering to include the app_identifier we have just made. Typically the query endpoints allow the user to supply a number of filters to limit the number of rows of data returned. You might prefer to do this type of filtering once you have the data in Excel or Power BI although for some datasets the amount of data returned will be large in which case limiting the data returned by country using the location_code or location_name query parameters is probably the best place to start.
Notice that we have selected CSV output_format in this case, and we have set the number of rows returned to 6000. I have put in a placeholder for the app_identifier – you should past in the value you created above.
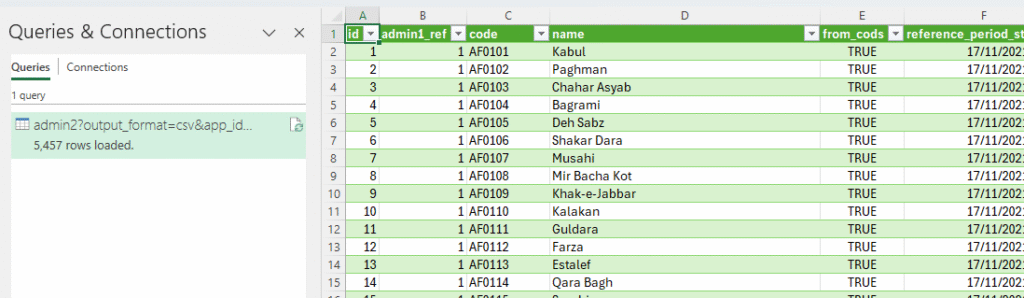
We can get the data by simply copying this URL into the Data->From Web dialogue box, since the data is in CSV format no further steps are required to fetch the data. On returning to Excel we should see this:
Notice that we downloaded 5,457 rows which is all of this dataset, luckily we set the limit to 6000 rows so we got all the data in one query. We talk more about this below when we discuss the use of the Advanced Editor.
Once we’ve loaded data into an Excel table we can process and the chart the data in any way we see fit.
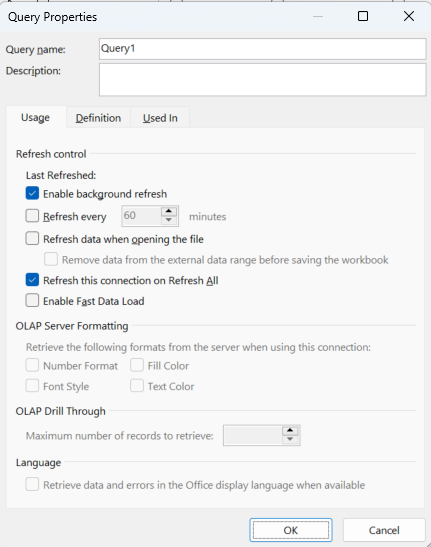
If we right-click the query entry in the Queries & Connections section we get query properties which allow us to control when data is refreshed – this means we can build a “live” report in Excel whose data is updated every time we open it or even more frequently:
Get more control with the Advanced Editor
For both the OpenAPI definition query and the HDX HAPI query we were able to get useful data without coding, just using the “point and click” interface. We can get more control of the data import process by using Power Query’s Advanced Editor.
The Advanced Editor is accessed in one of two ways, if we have an existing query then we can return to our Power Query Editor window we can click on the Advanced Editor button in the Home tab. Alternatively we can go to the Excel Data tab and select Get Data->Launch Power Query Editor and then on the right of the window select New Source->Other Sources->Blank Query, and then click on the Advanced Editor button, as before.
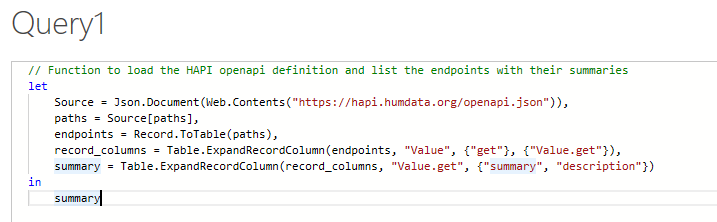
For the OpenAPI import the text of the query that Excel made as a result of our point and clicking looks like this:
It is written in M Language which is not found outside Power Query – the “M” stands for “Mashup” and it bears some resemblance to Microsoft’s functional programming language “F Sharp”. In M Language a function is defined with the “let” keyword and the returned value is found after the “in” keyword. Statements are separated with commas. Arrays are defined with curly brackets, and the data inside associative arrays are created and accessed using square brackets. Variable names can contain spaces but in this case they must be enclosed in double quote marks and preceded by a #.
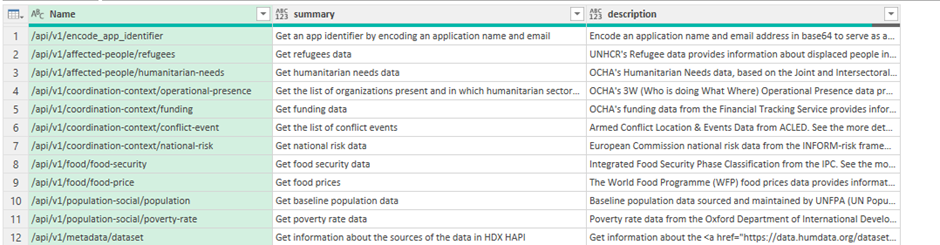
We can improve our OpenAPI import by writing our own query which extracts the summary and description columns for each endpoint and presents them together in a table:
The text for this query can be found here. When we click Done on this query we see the endpoints are now listed with summaries and descriptions:
For the query to the metadata/admin2 HDX HAPI endpoint we had a small issue in that we had to guess how many rows of data there were, and set the limit parameter larger than this value. This approach is not great because we had to discover this by trial and error, and if there had been more than 10,000 rows, the maximum we can supply to the API, we would have been stuck.
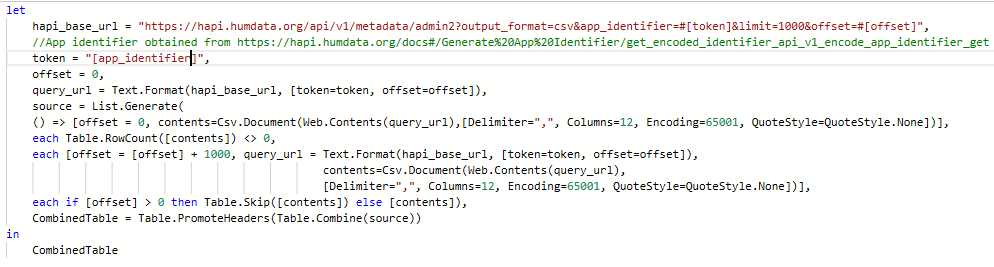
We can fix this issue by copy/pasting the following code into the Power Query Advanced Editor as we did above, remembering to add in our own app_identifier:
This function will compile all of the data for the query into a single table, continuing to fetch data until it reaches the end of the dataset. It works by using the List.Generate function to produce a list of tables of data which use a sequence of offset query parameters – you can think of the offset as a start point for a new page of data. The list terminates when no data is returned and then the list of tables is combined into one table to put into Excel. There is a little bit of code to ensure that we don’t repeat the column headers inside our data, which in CSV format are returned for each page.
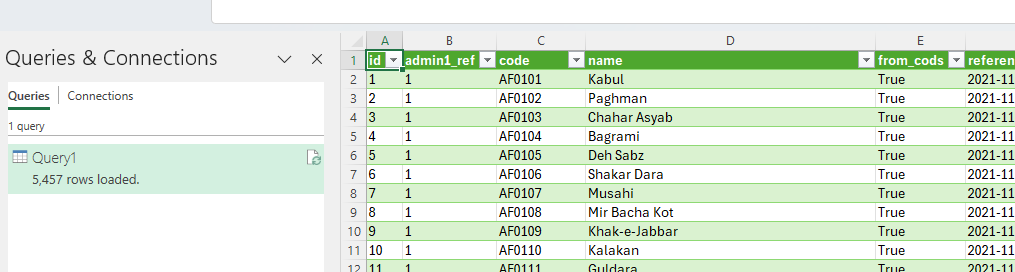
The result of running this function looks like this:
As you can see, we have loaded all 5,457 rows.
A benefit of the Advanced Editor approach is that it is easy to share simple recipes for fetching and processing data with others.
Using Power Query in Power BI
In the above we used Power Query in Excel to access data in HDX HAPI, the process in Power BI should be nearly identical. The only difference is that the Get Data menu item appears on the Home menu of Power BI. In practice we found that the OpenAPI query failed using the “point and click” method although both queries worked using the Advanced Editor route.
Summary
We have shown how Excel’s Power Query language can be used to access the data in HDX HAPI, first by using the “point and click” interface but then by making use of more sophisticated queries in the Power Query Advanced Editor which select particular items of data or retrieve multiple pages automatically. We also show how refreshing the data from the API can be controlled. The techniques demonstrated here should apply to any API which returns JSON or CSV format data on the basis of simple HTTP GET requests.
In an earlier blog post I explained the motivation for a series of “Rosetta Stone” posts which described the ecosystem for different programming languages. This post covers Rust, the associated GitHub repository with some minimal code is here. This blog post aims to provide some discussion around technology choices whilst the GitHub repository provides details of what commands to execute and a minimal example project.
I became interested in Rust because a number of new tools such as uv and ruff for the Python ecosystem are written in Rust. It’s fair to say there has been a buzz around the language in programming circles for some years.
About Rust
Rust started out as a personal project by Graydon Hoare, an employee of Mozilla, in 2006. It was adopted by Mozilla in 2009 and in 2012 the first public release was made. It was originally designed with a focus on memory management and memory safety. It stands with C and assembly as the only languages supported in the development of the Linux kernel. I read the The Rust Programming Language book recently, the distinguishing feature of Rust is the borrow checker and ownership model which is what gives it strong memory safety credentials.
Rust is named for the rust fungi, not the corrosion of iron but it seems few people realise this!
The home for the Rust language is here. Rust evolves through an RFC (request for comments) process, which can be found in the Rust RFC Book. Currently there is no formal specification for the language but there is an exercise to write one.
New versions of the language are released every 6 week (see here). Breaking changes can be introduced in editions (once every 3 years with the next edition, 2024, due in February 2025) but upgrading between editions is optional and there are tools to support version migrations. For more about the edition process see here.
There is a roadmap for the 2024 edition (see here) and presumably once that is released the next roadmap will be developed.
Rust Compilers
The Rust compiler is rustc, there are some alternatives but they are experiments rather than production systems. Typically rustc is invoked with the cargo package manager, see below. My first impression was that the compiler provided really good error messages.
Details of installation can be found here in the accompanying GitHub repository. Installing the whole Rust toolchain is ridiculously simple.
Package management
cargo is the Rust package manager, it is also typically used to compile code to produce a “crate” which may be a binary or library.
Rather neatly invoking cargo to produce a new package also creates a new Git repository with the appropriate layout:
cargo new hello_world --bin
This generates a cargo.toml file which defines the project and dependencies, and on compile a cargo.lock file is produced which specifies exactly the versions of all the dependences. This parallels the NPM system for JavaScript/TypeScript. There is also a --lib flag which generates a layout for a library package. In practice this is just a starting point, your code may include both binaries and libraries for which you will need to edit the cargo.toml file. However, this cargo new process reflects how I would start a project in Python.
The standard library is here, there are no built-in CSV or JSON libraries – regular readers will recall I use this as a measure of a language’s completeness since my favoured language, Python, has them! Others may have different opinions.
Third party Rust crates can be found on the crate registry.
Virtual environments
Rust does not require virtual environments since cargo fetches the appropriate packages on compile, it uses a local cache of packages but this is a true cache – if the version of a package is not in the cache then it is fetched.
Project layout for package publication
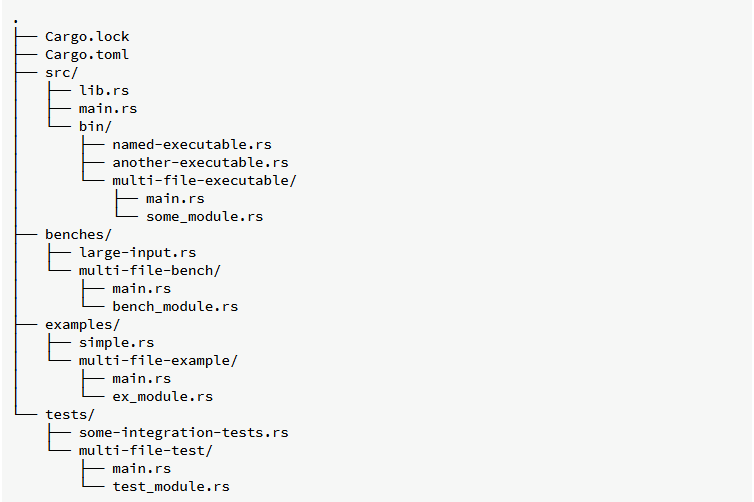
cargo new generates a minimal project layout. More generally the conventional project layout is shown below (see here) when code is compiled a target directory is created for the compiled code.
It is rather nice having a mandated project layout!
Testing
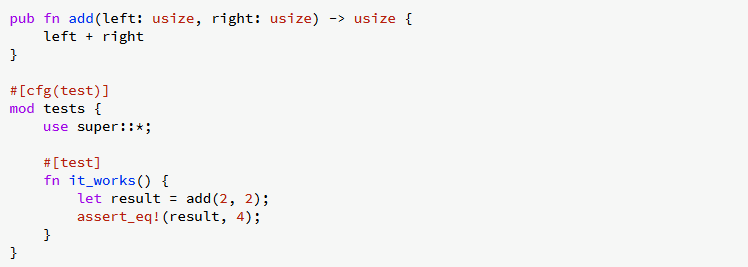
A testing framework is built-in and a skeleton test is included when a --lib project is created by cargo The tests look like this:
This is essentially a unit test and the intention in Rust is that the unit tests sit next to the functions which they test, in Python unit tests tend to be separated into tests directory. In a Rust project the tests directory holds integration tests. There is a third type of test, doctests which are embedded in the comments intended for documentation.
All three types of test can be run with cargo test.
The built-in test functionality does not include features such as mocks or parameterized tests but there are third party crates to provide this functionality.
Static analysis and formatting tools
Clippy is the built-in linter, used in addition to rustfmt, the formatter. The are invoked using cargo with cargo fmt and cargo clippy. As a compiled language the compiler provides static analysis too. I would not expect alternatives to clippy or rustfmt to gain much traction since these appear to be the “official” tools.
Documentation Generation
rustdoc is the standard documentation generator tool (see here), working from comments in code and invoked using cargo doc. It feels to me that there is scope for alternatives to rustdoc although perhaps I am mixing up the documentation generation engine with the standards for code comments for documentation which have arisen in Python.
Wrapping up
I was struck by how everything is pretty much built-in for Rust; compiling, packaging, testing, formatting, and linting. All of these tools can be driven from the package management tool, cargo. It is almost like the design team was trying to make the job of writing this post as easy as possible! In writing Rust code in associated with this post I found the built-in test framework missing features (like mocks and parameterization which I’m used to in Python), similarly the documentation system is quite simple so perhaps in time alternatives will start to predominate.
My “home” language of Python has acquired these features over a long period of time, utilizing third party libraries and tools that eventually became de facto standards.
It would be nice to make a comparison with Go which occupies a similar space in programming as a relatively recent arrival with what I believe is a similarly full tool suite.
I welcome comments, probably best on Mastodon where you can find me here.
My next review is a small departure, it is for The Rust Programming Language by Steve Klabnik and Carol Nichols but rather than buy the physical book I read this interactive version, which has quizzes and embedded, runnable code.
The Rust programming language is the target for my next Rosetta Stone blog post which identifies all the tooling for a language. For Rust these tools (the compiler, formatter, linter, package management and automated documentation) are pretty much all “built-in” so my job will be easy. The challenge in this case has been learning the language since I try to write a little code for the Rosetta Stone posts to demonstrate what I’ve learned.
Rust is a relatively new language, very highly regarded amongst developers and one of only two approved for developing Linux. Its focus is on “safety” and speed. It has been used to make new, highly performant tools for the Python ecosystem, like ruff and uv, which is how I came to know of it.
For a Python programmer Rust does not look alien in the way that Haskell and Lisp do; admittedly it uses curly braces for scoping, is strongly-typed and supports pointers and references which are not features of Python but are common in other languages.
To me it feels like C but with some object-oriented features; the authors talk explicitly about it having features of functional languages including use of the Option value which contains something or nothing, the compiler enforces the handling of nothing. I think I might start using this more explicitly in Python which allows type-hinting to indicate an Option-like value. The other explicitly referenced functional feature is the use of closures, in Python closures are functions defined within functions or anonymous / lambda functions whilst in Rust they seem to be closer to functions passed as arguments to other functions.
Rust makes what seems an odd distinction between functions and macros in its standard library. Macros are identified with an exclamation mark, for example println! As I understand this is because a macro is implemented using code generation at runtime which allows the developer to supply, for example, a variable number of arguments to println! which would not be possible for a function println. Python doesn’t make this distinction and is very permissive in the arguments that a function can take, allowing both position and keyword arguments of variable number.
I was struck by the way that different languages use the same word for different things. For example in Rust a struct is both a data container but can also carry methods in the way that “classes” in other languages do. In Python an enum is a closed list of values but in Rust those values can have user-defined associated values so that an enum for IP address protocols can contain V4 and V6 (as it would in Python) but in addition it can hold an actual IP address associated with each entry in the enumeration.
My understanding is that Rust is considered an object-oriented language by some but not all. In practical terms the only object-oriented feature missing is inheritance although this can be approximated by the use of generics and traits.
Since I have scarcely used pointers and references in 40 years of programming I found these concepts a bit challenging but I have made progress in my understanding through reading this book. Excited by this new found understanding I was then confused by Rust’s ownership model! Ownership and borrowing are the big, unique conceptual features of Rust. The aim of ownership is to rigorously ensure that code is safe – no writing past the end of arrays, or dereferencing null points. It also means that the performance hit of a garbage collector is not required, this task is pretty much entirely handled at compile time by the borrow checker. The strong ownership model makes concurrent programming easier too.
In trying to understand ownership and borrowing I found some useful tools, the best entry point was the BORIS tool by Christian Schott which lists other visualization tools including the Aquascope tool used in this book. I found the first such tool in RustViz which is used in teaching, it needs the user to put annotations into the code rather than working out the annotations itself. I also read this article by Chris Morgan.
As language books go, this one is pretty readable, and I found the built-in quizzes handy, if only to illustrate my ignorance particularly of the ownership and borrowing model. I think for my next technical book I might read Category Theory for Programmers by Bartosz Milewski. I have felt when applying type-hints to Python, and learning Rust and Haskell that I was missing out by not understanding at least the basics of category theory.
I enjoyed this book and the format worked pretty well for me, although I need to find a way of reading online content like this in more comfort. I’m keen to give Rust a go now!
The chapters vary considerably in length but average a little under 20 pages which works well for me – I find 20 pages is a reasonable chunk to read in one go. Although the chapters are presented without any organization, they are actually grouped into themes.
A few chapters are on algorithms, which is what I think of when people talk about beautiful code. A few chapters are on applications, and their architecture, a couple are on assistive technologies, a couple are on libraries/frameworks. A few are on operating system code: device driver architecture and handling threads. It is fair to say that beauty is in the eye of the beholder, and generally I felt authors wrote about their favourite piece of work rather than something that might be broadly considered beautiful code.
Several chapters I was more interested in the subject area than the actual code. There are a couple of chapters on bioinformatics (I was a lecturer in Biological Physics for a couple of years), a couple on Python (my primary programming language for the last 10 years or so) . The Python chapters are on the implementation of the dictionary in the core language and multidimensional iterators in Numpy (a widely used numerical library). The NASA chapter was a bit of a let-down since it involved strictly ground based code. However, I was excited to learn about the challenges of two Martian time zones as well as earth based time zones!
Pretty much all of the chapters contain moderate amounts of code. The implementing language varies, there are a number written using examples in Lisp. Ruby and Perl have a couple of outings, as does Haskell, also present are Java, C#, Python and C. Reading through the author biographies it seems some of them were involved in the creation or ongoing development of some of these languages.
I gave up on one chapter in part because it was in Lisp (not a language I’ve ever used) with no support except a suggestion to go read the first few chapters of the author’s book on Scheme (a dialect of Lisp) but also because it was about macro expansion which I’ve always considered a nasty kludge. Brian Hayes’ chapter also used Lisp but provides a little schematic diagram showing the structure of a Lisp function which was really helpful. Lisp programmers really like their brackets!
It was interesting to learn about Lisp’s advice functionality which is like Python decorators. Haskell is neat in its very clean separation between pure functions and functions with side effects. I can’t help thinking that both languages are best suited to highly mathematical developers working alone, their notation is exceedingly concise and impenetrable to outsiders. However, ideas from these more esoteric languages are usefully incorporated to more mainstream ones and programming styles.
Binary search and sorting are a feature of several of the early chapters. One author points out it took 12 years after its invention for a correct implementation of binary search to be written, and only 10% of developers get it right first time when implementing it themselves. The core error is an issue with numeric overflow which highlights that the difficulty of coding comes not just from algorithmic design but also lower level implementation details. The later chapter on the numerical analysis libraries from CERN (BLAS, LINPACK, LAPACK) highlight this again, optimum algorithms changed as the underlying machine CPU, memory and network architectures changed. The book finishes with a chapter on algorithms for checking the collinearity of three points on a plane, I liked this one. The twist at the end is that the best algorithm is to measure the area of the triangle the three points form, if it is zero then the points are colinear. This algorithm has the benefit if numerical stability, again a imposition of underlying numerical representation.
I liked the chapter on a logging framework, it made frequent references to design patterns and seemed like a nice example of beauty in higher level design.
In my view Charles Petzold’s chapter describes eldritch code, rather than beautiful! He shows how to generate C# intermediate language (IL) at runtime in order to speed up image processing operations. This involves line by line generation of raw IL using C#’s reflection functions. I’m not saying it is not very cunning or interesting but it isn’t pretty. It is also a personal interest of mine since I spent a number of years working on image analysis.
Some of the applications discussed have stood the test of time, ERP5 is still around as is Emacspeak (accessibility software for the blind). I can find no trace of Cryptonite (an email client) or Elocutor (accessibility software originally designed for Professor Stephen Hawking). Components of the Subversion and Perforce source control applications are included. Obsolesce seems to be a combination of the language used, the change in the web and competition. Beautiful Code was written in 2007, nearly 20 years ago and the web was a very different place then.
A couple of chapters talked about how code appeared on the page – I particularly liked the idea of “bookish” code, code laid out in the manner of a book or magazine to aid readability – interestingly this chapter was in favour of shorter variable names for readability rather than longer ones for description. A recurring theme is that the code is never beautiful in the first instance, it normally reaches beauty by a process of iteration and refinement.
The book was first published in 2007, and its age shows in some places. It finishes with biographies of the authors which could have more usefully been put with their respective chapters. I was sad to see that only one author appears to be a woman, I suspect this would be the case if the book was written now.
I enjoyed this book, most of the chapters struck some sort of cord with me.