
Category: Deva Data

Python Documentation with Sphinx

I’ve been working on a proof of concept project at work, and the time has come to convert it into a production system. One of the things it was lacking was documentation, principally for the developers who would continue work on it. For software projects there is a solution to this type of problem: automated documentation systems which take the structure of the code and the comments in it (written in a particular way) and generate human readable documentation from it – typically in the form of webpages.

For Python the “go to” tool in this domain is Sphinx.

I used Sphinx a few years ago, and although I got to where I wanted in terms of the documentation it felt like a painful process. This time around I progressed much more quickly and was happier with the results. This blog post is an attempt to summarise what I did for the benefit of others (including future me). Slightly perversely, although I use a Windows 10 laptop, I use Git Bash as my command prompt but I believe everything here will apply regardless of environment.

There are any number of Sphinx guides and tutorials around, I used this one by Sam Nicholls as a basis supplemented with a lot of Googling for answers to more esoteric questions. My aim here is to introduce some pragmatic solutions to features I wanted, and to clarify some thing that might seem odd if you are holding the wrong concept of how Sphinx works in your head.

I was working on a pre-existing project. To make all of the following work I ran “pip install …” for the following libraries: sphinx, sphinx-rtd-theme, sphinx-autodoc-typehints, and m2r2. In real life these additional libraries were added progressively. sphinx-rtd-theme gives me the the popular “Readthedocs” theme, Readthedocs is a site that publishes documentation and the linked example shows what can be achieved with Sphinx. sphinx-autodoc-typehints pulls in type-hints from the code (I talked about these in another blog post) and m2r2 allows the import of Markdown (md) format files, Sphinx uses reStructuredText (rst) format by default. These are both simple formats that are designed to translate easily into HTML format which is a pain to edit manually.

With these preliminaries done the next step is to create a “docs” subdirectory in the top level of your repository and run the “sphinx-quickstart” script from the commandline. This will ask you a bunch of questions, you can usually accept the default or provide an obvious answer. The only exception to this, to my mind, is when asked “Separate source and build directories“, you should answer “yes“. When this process finishes sphinx-quickstart will have generated a couple of directories beneath “docs“: “source” and “build“. The build directory is empty, the source directory contains a conf.py file which contains all the configuration information you just provided, an index.rst file and a Makefile. I show the full directory structure of the repository further down this post.

I made minor changes to conf.py, switching the theme with html_theme = ‘sphinx_rtd_theme’, and adding the extensions I’m using:

extensions = [
'sphinx.ext.autodoc',
'sphinx_autodoc_typehints',
'm2r2',
]

In the past I added these lines to conf.py but as of 2022-12-26 this seems not to be necessary:

import os 
import sys
sys.path.insert(0, os.path.abspath('..'))

This allows the Sphinx to “see” the rest of your repository from the docs directory.

The documentation can now be built using the “make html” command but it will be a bit dull.

In order to generate the documentation from code a command like: “sphinx-apidoc -o source/ ../project_code“, run from the docs directory will generate .rst files in the source directory which reflect the code you have. To do this Sphinx imports your code, and it will use the presence of the __init__.py file to discover which directories to import. It is happy to import subdirectories of the main module as submodules. These will go into files of the form module.submodule.rst.

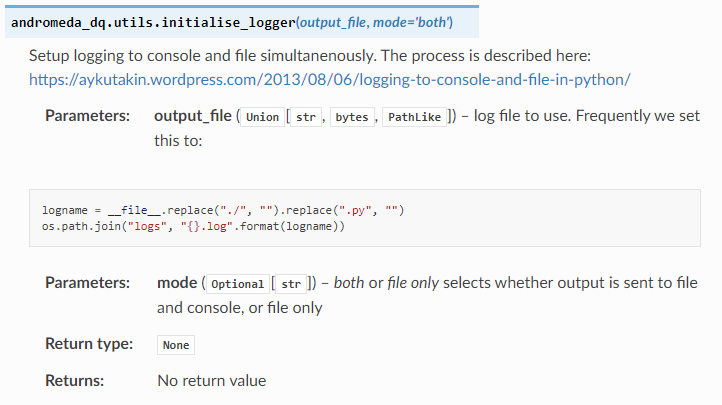
The rst files contain information from the docstrings in your code files, (those comments enclosed in triple double-quotes “””I’m a docstring”””. A module or submodule will get the comments from the __init__.py file as an overview then for each code file the comments at the top of the file are included. Finally, each function gets an entry based on its definition and some specially formatted documentation comments. If you use type-hinting, the sphinx-autodoc-typehints library will include that information in documentation. The following fragment shows most of the different types of annotation I am using in docstrings.

def initialise_logger(output_file:Union[str, bytes, os.PathLike], mode:Optional[str]="both")->None:
    """
    Setup logging to console and file simultanenously. The process is described here:
    Logging to Console and File In Python

    :param output_file: log file to use. Frequently we set this to:
    .. highlight:: python
    .. code-block:: python

            logname = __file__.replace("./", "").replace(".py", "")
            os.path.join("logs", "{}.log".format(logname)) 
        
    :param mode: `both` or `file only` selects whether output is sent to file and console, or file only
    
    :return: No return value
    """

My main complaint regarding the formatting of these docstrings is that reStructuredText (and I suspect all flavours of Markdown) are very sensitive to whitespace in a manner I don’t really understand. Sphinx can support other flavours of docstring but I quite like this default. The docstring above, when it is rendered, looks like this:
In common with many developers my first level of documentation is a set of markdown files in the top level of my repository. It is possible to include these into the Sphinx documentation with a little work. The two issues that need to be addressed is that commonly such files are written in Markdown rather reStructuredText. These can be fixed by using the m2r2 library. Secondly the top level of a repository is outside the Sphinx source tree, so you need to put rst files in the source directory which include the Markdown files from the root of the repository. For the CONTRIBUTIONS.md file the contributions.rst file looks like this:

.. mdinclude:: ../../CONTRIBUTIONS.md

Putting this all together the (edited) structure for my project looks like the following, I’ve included the top-level of the repository which contains the Markdown flavour files, the docs directory, where all the Sphinx material lives, and stubs to the directories containing the module code, with __init__.py files.

.

├── CONTRIBUTIONS.md
├── INSTALLATION.md
├── OVERVIEW.md
├── USAGE.md
├── andromeda_dq
│   ├── __init__.py
│   ├── scripts
│   │   ├── __init__.py
│   ├── tests
│   │   ├── __init__.py
├── docs
│   ├── Makefile
│   ├── make.bat
│   └── source
│       ├── _static
│       ├── _templates
│       ├── andromeda_dq.rst
│       ├── andromeda_dq.scripts.rst
│       ├── andromeda_dq.tests.rst
│       ├── conf.py
│       ├── contributions.rst
│       ├── index.rst
│       ├── installation.rst
│       ├── modules.rst
│       ├── overview.rst
│       └── usage.rst
├── setup.py

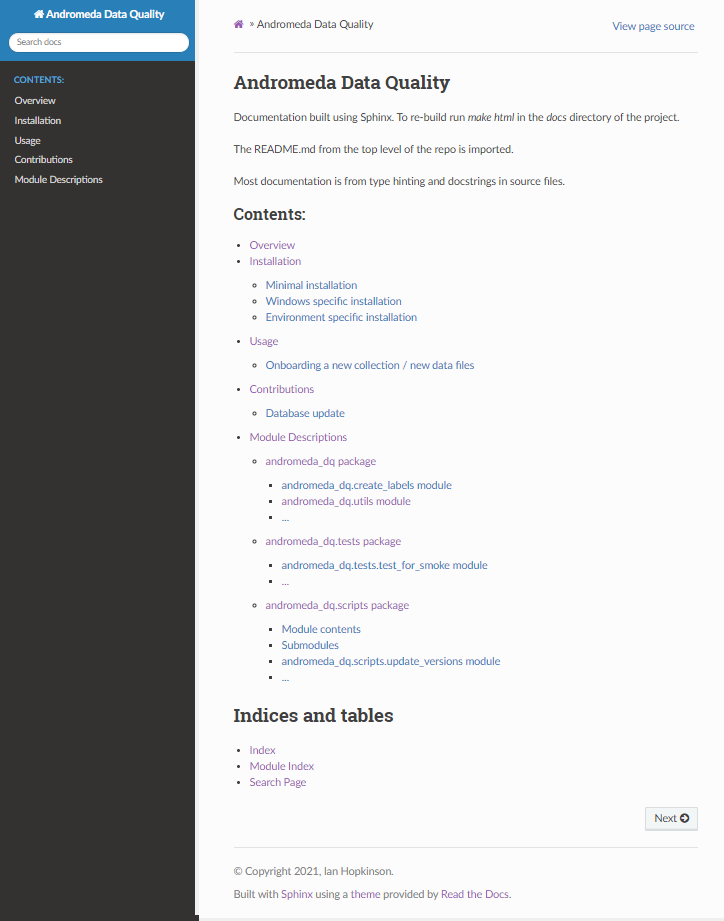
The index.rst file pulls together documentation in other rst files, these are referenced by their name excluded the rst extension (so myproject pulls in a link to myproject.rst). By default the index file does not pull in all of the rst files generated by apidoc, so these might need to be added (specifically the modules.rst file). The index.rst file for my project looks like this, all I have done manually to this file is add in overview, installation, usage, contributions and modules in the “toctree” section. Note that the indentation for these file imports needs to be the same as for the preceding :caption: directive.

.. Andromeda Data Quality documentation master file, created by
   sphinx-quickstart on Wed Sep 15 08:33:59 2021.
   You can adapt this file completely to your liking, but it should at least
   contain the root `toctree` directive.

Andromeda Data Quality
======================

Documentation built using Sphinx. To re-build run `make html` in the `docs`
directory of the project.

The OVERVIEW.md, INSTALLATION.md, USAGE.md, and CONTRIBUTIONS.md files are imported 
from the top level of the repo.

Most documentation is from type-hinting and docstrings in source files.

.. toctree::
   :maxdepth: 3
   :caption: Contents:

   overview
   installation
   usage
   contributions
   modules


Indices and tables
==================

* :ref:`genindex`
* :ref:`modindex`
* :ref:`search`

The (edited) HTML index page for the documentation looks like this:
For some reason Sphinx puts the text in the __init__.py files which it describes as “Module Contents” at the bottom of the relevant package description, this can be fixed by manually moving the “Module contents” section to the top of the file in the relevant package rst file.

There is a little bit of support for Sphinx in Visual Code, I’ve installed the reStructuredText Syntax highlighting extension and the Python Sphinx Highlighter extension. The one thing I haven’t managed to do is automate the process of running “make html” either on commit of new code, or when code is pushed to a remote. I suspect this will be one of the drawbacks in using Sphinx. I’m getting a bit better at adding type-hinting and docstrings as I code now.

If you have any comments, or suggestions, or find any errors in this blog post feel free to contact me on twitter (@ianhopkinson_).

Book review: Data Pipelines with Apache Airflow by Bas P Harenslak and Julian R De Ruiter

data-pipelinesMy next review is on Data Pipelines with Apache Airflow by Bas P Harenslak and Julian R De Ruiter. The book was published in 2021, and is compatible with Airflow 2.0 which was released at the end of 2020.

Airflow is all about orchestrating the movement of data from sources such as APIs and so forth into other places, it originated in Airbnb. It is designed for batch processing, rather than streaming data, and for pipelines that do not change much.

Data pipelines in Airflow are represented as “directed acyclic graphs” or DAGs which are defined in Python code using “Operators” which carry out tasks. A graph is a collection of nodes (tasks in this case) with “edges” between them. The “directed acyclic” bit means tasks have a definite order, the edges between them are “directed”, and the graph cannot have loops or cycles because that would imply having to finish a set of tasks before you could start them. Simple data pipelines would just be a linear set of tasks that always follow one from another, a more complicated pipeline might bring in data from several sources before combining them to produce a final data product.

The Operators are strung together using expressions of the form “operator 1 >> operator 2” or even “[operator 1, operator 2] >> operator 3”. 

Operators do not have to use Python, they can invoke code in other languages such as the BashOperator, or interact with other systems such as databases or storage systems such as S3. It is relatively easy to write your own operators. Alongside operators that do stuff there are branch operators which select one or other path in the DAG, and there are also sensors which detect changes in filesystems and trigger work and hooks which form connections with external services. Dummy operators can be used to simplify the appearance of DAGs.

As an orchestration system the intention of operators is that they should not contain a great deal of code to process data, that function should be off-loaded to libraries or systems elsehwhere.

The Airflow system is comprised of a web server which allows you to observe / trigger execution of DAGs, a scheduler which is responsible for the scheduled running of DAGs and workers which do the actual work of the DAG. The Airflow system loops over the tasks defined in a DAG, and tries to execute tasks which depends on the tasks upstream of the task in question, if they have been successfully completed then a task can execute.

A basic implementation runs DAGs locally using a simple queue to schedule work, and a sqlite database to store metadata. A production implementation would use something like Postgres or Amazon RDS as the metadata store, schedule work using Celery and run tasks in Docker containers marshalled using Kubernetes.

For some reason reading this I was reminded that big projects like Airflow are just other people’s code, and if you look too carefully you’ll find something nasty. This is both comforting and mildly scary. I think the issue was that Airflow uses jinja templating to inject parameters into code which feels wrong but is probably a pragmatic and safe why to do it, these shenanigans are not required for Python operators. Also discussed are issues with code dependencies, which the authors suggest are best eliminated by putting operators into Docker containers each of which contain their own code dependencies – allowing otherwise dependency incompatible libraries to work together. 

Alongside the material on Airflow there are moderate chunks on Python modules, testing, Docker and Kubernetes and logging so you get a well rounded view not only of Airflow but also of the ecosystem it sits in. The book finishes with deployment into various Cloud environments. I found these parts quite useful since the most complicated work I do in my role is trying to get things to work in AWS! The data science part is easy…

The book finishes with some short chapters on Cloud deployments, mentioning first fully managed services such as astronomer.io, Amazon MWAA and Google Cloud Composer before going on to talking about implementation of one of the demos in the book on AWS, Azure and Google cloud services. I considered skipping these chapters but they turned out be quite interesting in highlighting the differences between services and perhaps the preferences of the authors of both the book and of Airflow.

I found this a readable introduction to Airflow with some nice examples, and interesting additional material. Useful if you are thinking about using Airflow, or even if you are working on data pipelines without Airflow since it provides a good description of the moving parts required.

The code repository for the book is here: https://github.com/BasPH/data-pipelines-with-apache-airflow

Book review: Exercises in Programming Style by Cristina Videira Lopes

exercises_in_programming_styleRecently our CIO has allowed us to claim one technical book per quarter on expenses as part of our continuing professional development. Needless to say since I was buying these books already I leapt at the opportunity! The first fruit of this policy is Exercises in Programming Style by Cristina Videira Lopes.

The book is modelled on Raymond Queneau’s book Exercises in Style which writes the same story in 99 different ways.

Exercises in Programming Style takes a simple exercise: counting the frequency of words in a file and reporting the top 25 words, and writes a program to do this in forty different styles spread across 10 sections.

The sections are historical, basic styles, function composition, objects and object interaction, reflection and metaprogramming, adversity, data-centric, concurrency, interactivity, and neural networks. The section on neural networks breaks the pattern with example programmes only handling small elements of the word frequency problem. The sections vary in size, the objects and object interaction is the largest.

Lopes talks about styles in terms of constraints, for example in the “Good old times” historical style there are no named variables and limited memory, in the “Letterbox” style objects pass messages to one another to prompt actions.

The shortest implementation of the example is in the “Code Golf” chapter with just six lines, other examples run to a couple of pages – a hundred lines or so. Lopes is somewhat opinionated as to style but quite balanced providing reasoning where unusual styles may be appropriate. This was most striking for me in the section on “Adversity” which discussed error-handling. Lopes suggests that a “Passive Aggressive” style with error handling all occurring at the top level in a try-except block is better than my error handling to date which has been more in the “Constructivist” (trapping errors but proceeding with defaults) or “Tantrum”(catching errors and refusing to proceed) style.

Sometimes the fit to the style format feels slightly forced, in particular in the chapters relating to neural networks but in the Data-Centric chapter I learnt how to implement spreadsheet-like functionality in Python which is interesting.

I’ve been programming for about 40 years but as a physical scientist analysing data or trying out numerical models rather than a professional developer. Exercises  brings together many bits and pieces of things I’ve learnt, often in the context of different languages. For a while I’ve had the feeling that I didn’t need to learn new languages, I needed to learn how to apply new techniques in my favoured language (Python) and this book does exactly that.

Once again I was bemused to see Python’s “gentleman’s agreement” methodology over certain matters. By convention methods of a class whose name start with an underscore are considered private but this isn’t enforced so if you really want to use a “private” method just go ahead. Similarly many object-oriented languages support a “this” keyword for the members of a class to refer to themselves. Python uses “self” but only by convention, you can specify “self” is “me” or whatever other name you please. The style format provides a nice way of demonstrating a feature of Python in a non-trivial but minimal functioning manner.

It is somewhat chastening to discover that many of the styles in this book had their abstract origins in the 1960s, shortly before I was born, entered experimental languages such as Smalltalk in the seventies where I would have read about them in computer magazines and became mainstream in the eighties and nineties in languages like C++, Java and Python, not long after the start of my programming career. Essentially, most of the action in this book has taken place during my lifetime! In physics we are used to the figures in our eponymous laws (Newton, Maxwell etc) being very long dead. In computing the same does not apply.

What I take away from Exercises is that to a fair degree modern programming languages can be used to implement a wide range of the ideas generated in computer science over the last 50 or so years so in improving your skill as a programmer learning new languages is not the highest priority. There is a benefit to learning new techniques in a language in which your are familiar. Clearly some languages are designed heavily to support a certain style, for example Haskell and functional programming but I found it easier to understand monads explained in the context of Python than in Haskell where everything was alien.

Exercises is surprisingly readable, the programs are well-documented and Lopes’ text is short but clear with references to further reading. It stands alongside Seven databases in Seven Weeks by Eric Redmond and Jim R. Wilson as a book that I will rave about and recommend to everyone!

Unit testing in Python using the unittest module

The aim of this blog post is to capture some simple “recipes” on testing code in Python that I can return to in the future. I thought it would also be worth sharing some of my thinking around testing more widely. The code in this GitHub gist illustrates the testing features I mention below.

My journey with more formal code testing started about 10 years ago when I was programming in Matlab. It only really picked up a couple of years later when I moved to work at a software startup, coding in Python. I’ve read a couple of books on testing (BDD in action by John Ferguson Smart, Test-Driven Development with Python by Harry J.W. Percival) as well as Working effectively with legacy code by Michael C. Feathers which talks quite a lot about testing. I wrote a blog post a number of years ago about testing in Python when I had just embarked on the testing journey.

As it stands I now use unit testing fairly regularly although the test coverage in my code is not great.

Python has two built-in mechanisms for carrying out tests, the doctest and the unittest modules. Doctests are added as comments to the top of function definitions (see lines 27-51 in the gist above). They are run either by adding calling doctest.testmod() in a script, or adding doctest to a Python commandline as shown below.

python -m doctest -v tests.py

Personally I’ve never used doctest – I don’t like the way the tests are scattered around the code rather than being in one place, and the “replicating the REPL” seems a fragile process but I include them here for completeness.

That leaves us with the unittest module. In Python it is not unusual use a 3rd party testing library which runs on top of unittest, popular choices include nosetests and, more recently, pytest. These typically offer syntactic sugar in terms of making tests slightly easier to code, and read. There is also additional functionality in writing and running test suites. Unittest is based on the Java testing framework, Junit, as such it inherits an object-oriented approach that demands tests are methods of a class derived from unittest.TestCase. This is not particularly Pythonic, hence the popularity of 3rd party libraries.

I’ve used nosetest for a while, now but it looks like its use is no longer recommended since it is no longer being developed. Pytest is the new favoured 3rd party library. Personally, I’m probably going to revert to writing tests using unittest. As a result of writing this blog post I will probably stop using nosetests as a test runner and simply use pure unittest.

The core of unittest is to call the function under test with a set of parameters, and check that the function returns the correct response. This is done using one of the assert* methods of the unittest.TestCase class. I nearly always end up using assertEquals. This is shown in minimal form in lines 67-76 above.

With data science work we often have a list of quite similar tests to run, calling the same function with a list of arguments and checking off the response against the expected value. Writing a function for each test case is a bit laborious, unittest has a couple of features to help with this:

  • subTest puts all the test cases into a single test function, and executes them all, reporting only those that fail (see lines 82-90). This is a compact approach but not verbose. Note that nosetests does not run subTest correctly, it being a a feature of unittest only introduced in Python 3.4 (2014);
  • alternatively we can use a functional programming trip to programmatically generate test functions and add them to the unittest.TestCase class we have derived, this is shown on lines 105-116;

Sometimes you write tests that you don’t always want to run either because they are slow to run, or because you used them in addressing a particular problem and now want to keep for the purposes of documentation but not to run. Decorators in unittest are used to skip tests, @unittest.skip() is the simplest of these, this is an “opt-out”.

Once you’ve written your tests then you need to run them. I liked using nosetests for this, if you ran it in a directory then it would trundle off and find any files that looked like they contained tests and run them, reporting back on the results of the tests.

Unittest has some test discovery functionality which I haven’t yet explored, the simplest way of invoking it is simply by running the script file using:

python tests.py -v

The -v flag indicates that output should be “verbose”, the name of each test is shown with a pass/fail status, and debug output if a test fails. By default unittest shows print messages from the test functions and the code being tested on the console, and also logging messages which can confuse test output. These can be supressed by running tests with the -b flag at the commandline or setting the buffer argument to True in the call to unittest.main(). Logging messages can be supressed by adding a NullHandler, as shown in the gist above on lines 188-119.

The only functionality I’ve used in nosetests and can’t do using pure unittest is re-running only those tests that failed. This limitation could be worked around using the -k commandline flag and using a naming convention to track those test still failing.

Not covered in this blog post are the setUp and tearDown methods which can be run before and after each test method.  

I hope you found this blog post useful, I found writing it helpful in clarifying my thoughts and I now have a single point of reference in future.

Type annotations in Python, an adventure with Visual Studio Code and Pylance

I’ve been a Python programmer pretty much full time for the last 7 or 8 years, so I keep an eye out for new tools to help me with this. I’ve been using Visual Studio Code for a while now, and I really like it. Microsoft have just announced Pylance, the new language server for Python in Visual Studio Code.

The language server provides language-sensitive help like spotting syntax errors, providing function definitions and so forth. Pylance is based on the type checking engine Pyright. Python is a dynamically typed language but recently has started to support type annotations. Dynamic typing means you don’t tell the interpreter what “type” a variable is (int, string and so forth) you just use it as such. This contrasts with statically typed languages where for every variable and function you define a type as you write your code. Type annotations are a halfway house, they are not used by the Python interpreter but they can be used by tools like Pylance to check code, making it more likely to run correctly on first go.

Pylance provides a range of “Intellisense” code improvement features, as well as type annotation based checks (which can be switched off).

I was interested to use the type annotations checking functionality since one of the pleasures of working with statically typed languages is that once you’ve satisfied your compiler that all of the types are right then it has a better chance of running correctly than a program in a dynamically typed language.

I will use the write_dictionary function in my little ihutilities library as an example here, this function is defined in the file io_utils.py. The appropriate type annotation for write_dictionary is:

def write_dictionary(filename: str, data: List[Dict[str,Any]], 
append:Optional[bool]=True, delimiter:Optional[str]=",") -> None:

Essentially each variable is followed by a colon, and then a type (i.e str). Certain types are imported from the typing library (Any, List, Optional and Dict in this instance). We supply the types of the elements of the list, or dictionary. The Any type allows for any type. The Optional keyword is used for optional parameters which can have a default value. The return type is put at the end after the ->. In a *.pyi file described below, the function body is replaced with ellipsis (…).

Actually the filename type hint shouldn’t be string but I can’t get the approved type of Union[str, bytes, os.PathLike] to work with Pylance at the moment.

As an aside Pylance spotted that two imports in the io_utils.py library were unused. Once I’d applied the type annotation to the function definition it inferred the types of variables in the code, and highlighted where there might be issues. A recurring theme was that I often returned a string or None from a function, Pylance indicated this would cause a problem if I tried to measure the length of None.

There a number of different ways of providing typing information, depending on your preference and whether you are looking at your own code, or at a 3rd party library:

  1. Types provided at definition in the source module – this is the simplest method, you just replace the function def line in the source module file with the type annotated one;
  2. Types provided in the source module by use of *.pyi files – you can also put the type-annotated function definition in a *.pyi file alongside the original file in the source module in the manner of a C header file. The *.pyi file needs to sit in the same directory as its *.py sibling. This definition takes precedence over a definition in the *.py file. The reason for using this route is that it does not bring incompatible syntax into the *.py files – non-compliant interpreters will simply ignore *.pyi files but it does clutter up your filespace. Also there is a risk of the *.py and *pyi becoming inconsistent;
  3. Stub files added to the destination project – if you import write_dictionary into a project Pylance will highlight that it cannot find a stub file for ihutilities and will offer to create one. This creates a `typings` subdirectory alongside the file on which this fix was executed, this contains a subdirectory called `ihutilities` in which there are files mirroring those in the ihutilities package but with the *.pyi extension i.e. __init__.pyi, io_utils.py, etc which you can modify appropriately;
  4. Types provided by stub-only packages – PEP-0561 indicates a fourth route which is to load the type annotations from a separate, stub only, module.
  5. Types provided by Typeshed – Pyright uses Typeshedfor annotations for built-in and standard libraries, as well as some popular third party libraries;

Type annotations were introduced in Python 3.5, in 2015, so are a relatively new language feature. Pyright is a little over a year old, and Pylance is a few days old. Unsurprisingly documentation in this area is relatively undeveloped. I found myself looking at the PEP (Python Enhancement Proposals) references as often as not to understand what was going on. If you want to see a list of relevant PEPs then there is a list on the Pyright README.md, I even added one myself.

Pylance is a definite improvement on the old Python language server which was itself more than adequate. I am currently undecided about type annotations, the combination of Pylance and type annotations caught some problems in my code which would only come to light in certain runtime circumstances. They seem to be a bit of an overhead which I suspect I would only use for frequently used library routines, and core code which gets run a lot and is noticeable by others when it fails. I might start by adding in some *.pyi files to my active projects.