Tag: data science

Adventures in Kaggle: Forest Cover Type Prediction


forest_cover_thumb
This post was first published at ScraperWiki.

Regular readers of this blog will know I’ve read quite few machine learning books, now to put this learning into action. We’ve done some machine learning for clients but I thought it would be good to do something I could share. The Forest Cover Type Prediction challenge on Kaggle seemed to fit the bill. Kaggle is the self-styled home of data science, they host a variety of machine learning oriented competitions ranging from introductory, knowledge building (such as this one) to commercial ones with cash prizes for the winners.

In the Forest Cover Type Prediction challenge we are asked to predict the type of tree found on 30x30m squares of the Roosevelt National Forest in northern Colorado. The features we are given include the altitude at which the land is found, its aspect (direction it faces), various distances to features like roads, rivers and fire ignition points, soil types and so forth. We are provided with a training set of around 15,000 entries where the tree types are given (Aspen, Cottonwood, Douglas Fir and so forth) for each 30x30m square, and a test set for which we are to predict the tree type given the “features”. This test set runs to around 500,000 entries. This is a straightforward supervised machine learning “classification” problem.

The first step must be to poke about at the data, I did a lot of this in Tableau. The feature most obviously providing predictive power is the elevation, or altitude of the area of interest. This is shown in the figure below for the training set, we see Ponderosa Pine and Cottonwood predominating at lower altitudes transitioning to Aspen, Spruce/Fir and finally Krummholz at the highest altitudes. Reading in wikipedia we discover that Krummholz is not actually a species of tree, rather something that happens to trees of several species in the cold, windswept conditions found at high altitude.

Figure1

Data inspection over I used the scikit-learn library in Python to predict tree type from features. scikit-learn makes it ridiculously easy to jump between classifier types, the interface for each classifier is the same so once you have one running swapping in another classifier is a matter of a couple of lines of code. I tried out a couple of variants of Support Vector Machines, decision trees, k-nearest neighbour, AdaBoost and the extremely randomised trees ensemble classifier (ExtraTrees). This last was best at classifying the training set.

The challenge is in mangling the data into the right shape and selecting the features to use, this is the sort of pragmatic knowledge learnt by experience rather than book-learning. As a long time data analyst I took the opportunity to try something: essentially my analysis programs would only run when the code had been committed to git source control and the SHA of the commit, its unique identifier, was stored with the analysis. This means that I can return to any analysis output and recreate it from scratch. Perhaps unexceptional for those with a strong software development background but a small novelty for a scientist.

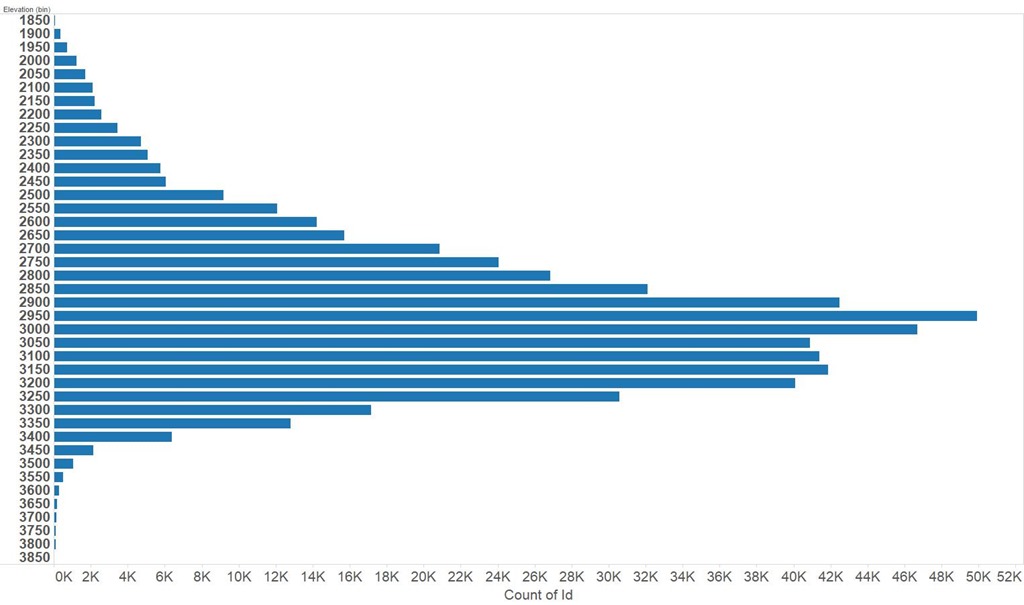
Using a portion of the training set to do an evaluation it looked like I was going to do really well on the Kaggle leaderboard but on first uploading my competition solution things looked terrible! It turns out this was a common experience and is a result of the relative composition of the training and test sets. Put crudely the test set is biased to higher altitudes than the training set so using a classifier which has been trained on the unmodified training set leads to poorer results then expected based on measurements on a held back part of the training set. You can see the distribution of elevation in the test set below, and compare it with the training set above.

figure2

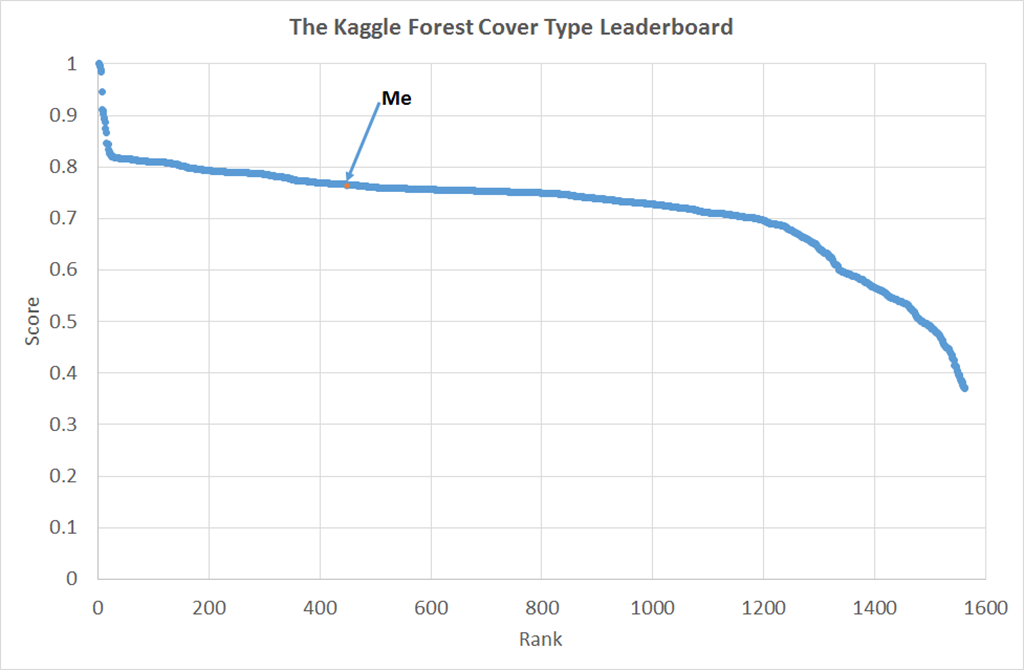
We can fix this problem by biasing the training set to more closely resemble the test set, I did this on the basis of the elevation. This eventually got me to 430 rank on the leaderboard, shown in the figure below. We can see here that I’m somewhere up the long shallow plateau of performance. There is a breakaway group of about 30 participants doing much better and at the bottom there are people who perhaps made large errors in analysis but got rescued by the robustness of machine learning algorithms (I speak from experience here!).

figure3

There is no doubt some mileage in tuning the parameters of the different classifiers and no doubt winning entries use more sophisticated approaches. scikit-learn does pretty well out of the box, and tuning it provides marginal improvement. We observed this in our earlier machine learning work too.

I have mixed feelings about the Kaggle competitions. The data is nicely laid out, the problems are interesting and it’s always fun to compete. They are a great way to dip your toes in semi-practical machine learning applications. The size of the awards mean it doesn’t make much sense to take part on a commercial basis.

However, the data are presented such as to exclude the use of domain knowledge, they are set up very much as machine learning challenges – look down the competitions and see how many of them feature obfuscated data likely for reasons of commercial confidence or to make a problem more “machine learning” and less subjectable to domain knowledge. To a physicist this is just a bit offensive.

If you are interested in a slightly untidy blow by blow account of my coding then it is available here in a Bitbucket Repo.

Book review: How Linux works by Brian Ward


hlw2e_cover-new_webThis review was first published at ScraperWiki.

A break since my last book review since I’ve been coding, rather than reading, on the commute into the ScraperWiki offices in Liverpool. Next up is How Linux Works by Brian Ward. In some senses this book follows on from Data Science at the Command Line by Jeroen Janssens. Data Science was about doing analysis with command line incantations, How Linux Works tells us about the system in which that command line exists and makes the incantations less mysterious.

I’ve had long experience with doing analysis on Windows machines, typically using Matlab, but over many years I have also dabbled with Unix systems including Silicon Graphics workstations, DEC Alphas and, more recently, Linux. These days I use Ubuntu to ensure compatibility with my colleagues and the systems we deploy to the internet. Increasingly I need to know more about the underlying operating system.

I’m looking to monitor system resources, manage devices and configure my environment. I’m not looking for a list of recipes, I’m looking for a mindset. How Linux Works is pretty good in this respect. I had a fair understanding of pipes in *nix operating systems before reading the book, another fundamental I learnt from How Linux Works was understanding that files are used to represent processes and memory. The book is also good on where these files live – although this varies a bit with distribution and time. Files are used liberally to provide configuration.

The book has 17 chapters covering the basics of Linux and the directory hierarchy, devices and disks, booting the kernel and user space, logging and user management, monitoring resource usage, networking and aspects of shell scripting and developing on Linux systems. They vary considerably in length with those on developing relatively short. There is an odd chapter on rsync.

I got a bit bogged down in the chapters on disks, how the kernel boots, how user space boots and networking. These chapters covered their topics in excruciating detail, much more than required for day to day operations. The user startup chapter tells us about systemd, Upstart and System V init – three alternative mechanisms for booting user space. Systemd is the way of the future, in case you were worried. Similarly, the chapters on booting the kernel and managing disks at a very low level provide more detail than you are ever likely to need. The author does suggest the more casual reader skip through the more advanced areas but frankly this is not a directive I can follow. I start at the beginning of a book and read through to the end, none of this “skipping bits” for me!

The user environments chapter has a nice section explaining clearly the sequence of files accessed for profile information when a terminal window is opened, or other login-like activity. Similarly the chapters on monitoring resources seem to be pitched at just the right level.

Ward’s task is made difficult by the complexity of the underlying system. Linux has an air of “If it’s broke, fix it and if ain’t broke, fix it anyway”. Ward mentions at one point that a service in Linux had not changed for a while therefore it was ripe for replacement! Each new distribution appears to have heard about standardisation (i.e. where to put config files) but has chosen to ignore it. And if there is consistency in the options to Linux commands it is purely co-incidental. I think this is my biggest bugbear in Linux, I know which command to use but the right option flags are more just blindly remembered.

The more Linux-oriented faction of ScraperWiki seemed impressed by the coverage of the book. The chapter on shell scripting is enlightening, providing the mindset rather than the detail, so that you can solve your own problems. It’s also pragmatic in highlighting where to to step in shell scripting and move to another language. I was disturbed to discover that the open-square bracket character in shell script is actually a command. This “explain the big picture rather than trying to answer a load of little questions”, is a mark of a good technical book.  The detail you can find on Stackoverflow or other Googling.

How Linux Works has a good bibliography, it could do with a glossary of commands and an appendix of the more in depth material. That said it’s exactly the book I was looking for, and the writing style is just right. For my next task I will be filleting it for useful commands, and if someone could see their way to giving me a Dell XPS Developer Edition for “review”, I’ll be made up.

Book review: Data Science at the Command Line by Jeroen Janssens


datascienceatthecommandlineThis review was first published at ScraperWiki.

In the mixed environment of ScraperWiki we make use of a broad variety of tools for data analysis. Data Science at the Command Line by Jeroen Janssens covers tools available at the Linux command line for doing data analysis tasks. The book is divided thematically into chapters on Obtaining, Scrubbing, Modeling, Interpreting Data with “intermezzo” chapters on parameterising shell scripts, using the Drake workflow tool and parallelisation using GNU Parallel.

The original motivation for the book was a desire to move away from purely GUI based approaches to data analysis (I think he means Excel and the Windows ecosystem). This is a common desire for data analysts, GUIs are very good for a quick look-see but once you start wanting to repeat analysis or even repeat visualisation they become more troublesome. And launching Excel just to remove a column of data seems a bit laborious. Windows does have its own command line, PowerShell, but it’s little used by data scientists. This book is about the Linux command line, examples are all available on a virtual machine populated with all of the tools discussed in the book.

The command line is at its strongest with the early steps of the data analysis process, getting data from places, carrying out relatively minor acts of tidying and answering the question “does my data look remotely how I expect it to look?”. Janssens introduces the battle tested tools sed, awk, and cut which we use around the office at ScraperWiki. He also introduces jq (the JSON parser), this is a more recent introduction but it’s great for poking around in JSON files as commonly delivered by web APIs. An addition I hadn’t seem before was csvkit which provides a suite of tools for processing CSV at the command line, I particularly like the look of csvstat. csvkit is a Python tool and I can imagine using it directly in Python as a library.

The style of the book is to provide a stream of practical examples for different command line tools, and illustrate their application when strung together. I must admit to finding shell commands deeply cryptic in their presentation with chunks of options effectively looking like someone typing a strong password. Data Science is not an attempt to clear the mystery of these options more an indication that you can work great wonders on finding the right incantation.

Next up is the Rio tool for using R at the command line, principally to generate plots. I suspect this is about where I part company with Janssens on his quest to use the command line for all the things. Systems like R, ipython and the ipython notebook all offer a decent REPL (read-evaluation-print-loop) which will convert seamlessly into an actual program. I find I use these REPLs for experimentation whilst I build a library of analysis functions for the job at hand. You can write an entire analysis program using the shell but it doesn’t mean you should!

Weka provides a nice example of smoothing the command line interface to an established package. Weka is a machine learning library written in Java, it is the code behind Data Mining: Practical Machine Learning Tools and techniques. The edges to be smoothed are that the bare command line for Weka is somewhat involved since it requires a whole pile of boilerplate. Janssens demonstrates nicely how to do this by developing automatically autocompletion hints for the parts of Weka which are accessible from the command line.

The book starts by pitching the command line as a substitute for GUI driven applications which is something I can agree with to at least some degree. It finishes by proposing the command line as a replacement for a conventional programming language with which I can’t agree. My tendency would be to move from the command line to Python fairly rapidly perhaps using ipython or ipython notebook as a stepping stone.

Data Science at the Command Line is definitely worth reading if not following religiously. It’s a showcase for what is possible rather than a reference book as to how exactly to do it.

Book review: Remote Pairing by Joe Kutner


jkrp_xlargecoverThis review was first published at ScraperWiki.

Pair programming is an important part of the Agile process but sometimes the programmers are not physically co-located. At ScraperWiki we have staff who do both scheduled and ad hoc remote working therefore methods for working together remotely are important to us. A result of a casual comment on Twitter, I picked up “Remote Pairing” by Joe Kutner which covers just this subject.

Remote Pairing is a short volume, less than 100 pages. It starts for a motivation for pair programming with some presentation of the evidence for its effectiveness. It then goes on to cover some of the more social aspects of pairing – how do you tell your partner you need a “comfort break”? This theme makes a slight reprise in the final chapter with some case studies of remote pairing. And then into technical aspects.

The first systems mentioned are straightforward audio/visual packages including Skype and Google Hangouts. I’d not seen ScreenHero previously but it looks like it wouldn’t be an option for ScraperWiki since our developers work primarily in Ubuntu; ScreenHero only supports Windows and OS X currently. We use Skype regularly for customer calls, and Google Hangouts for our daily standup. For pairing we typically use appear.in which provides audio/visual connections and screensharing without the complexities of wrangling Google’s social ecosystem which come into play when we try to use Google Hangouts.

But these packages are not about shared interaction, for this Kutner starts with the vim/tmux combination. This is venerable technology built into Linux systems, or at least easily installable. Vim is the well-known editor, tmux allows a user to access multiple terminal sessions inside one terminal window. The combination allows programmers to work fully collaboratively on code, both partners can type into the same workspace. You might even want to use vim and tmux when you are standing next to one another. The next chapter covers proxy servers and tmate (a fork of tmux) which make the process of sharing a session easier by providing tunnels through the Cloud.

Remote Pairing then goes on to cover interactive screensharing using vnc and NoMachine, these look like pretty portable systems. Along with the chapter on collaborating using plugins for IDEs this is something we have not used at ScraperWiki. Around the office none of us currently make use of full blown IDEs despite having used them in the past. Several of us use Sublime Text for which there is a commercial sharing product (floobits) but we don’t feel sufficiently motivated to try this out.

The chapter on “building a pairing server” seems a bit out of place to me, the content is quite generic. Perhaps because at ScraperWiki we have always written code in the Cloud we take it for granted. The scheme Kutner follows uses vagrant and Puppet to configure servers in the Cloud. This is a fairly effective scheme. We have been using Docker extensively which is a slightly different thing, since a Docker container is not a virtual machine.

Are we doing anything different in the office as a result of this book? Yes – we’ve got a good quality external microphone (a Blue Snowball), and it’s so good I’ve got one for myself. Managing audio is still something that seems a challenge for modern operating systems. To a human it seems obvious that if we’ve plugged in a headset and opened up Google Hangouts then we might want to talk to someone and that we might want to hear their voice too. To a computer this seems unimaginable. I’m looking to try out NoMachine when a suitable occasion arises.

Remote Pairing is a handy guide for those getting started with remote working, and it’s a useful summary for those wanting to see if they are missing any tricks.

Git–notes

logo@2xI’ve discovered that my blog is actually a good place to put things I need to remember see, for example, my blog post on running Ubuntu in a VM on Windows 8.

In this spirit here are my notes on using git, the distributed version control system (DVCS). These are things I picked up around the office at ScraperWiki, I wrote something there about the scheme we use for Git. This is more a compendium of useful git commands.

I use Git on both Windows and Ubuntu and I have accounts with both GitHub and Bitbucket. I’ve configured ssh on my Windows and Ubuntu machines and use that for authentication. I Windows I interact with Git using Git Bash.

Installation

On installing Git I do the following setup, obviously using my own name and email:

git config --global user.name "John Doe"
git config --global user.email [email protected]
git config --global core.editor vim

I can list my config settings using:

git config -l

Starting a repo

To start a new repo we do:

git init

These days I feel bereft if I’m not “pushing” my local repository to an online repository like GitHub or BitBucket. To add a remote repository create one using the service of your choice which will probably ask you to do:

git remote add origin [url]

Alternatively you can clone an existing repository into a subdirectory of your current directory with the name of the repo:

git clone [url]

This one clones into current directory, making a mess if that’s not what you intended!

git clone [url] .

A variant, if you are using a repo with submodules in it, :

git clone –recursive [url]

If you forgot to do the above on first cloning then you can do:

git submodule update –init

Adding and committing files

If you’ve started a new repository then need to add some files to track:

git add [filename]

You don’t have to commit all the changes you made since the last commit, you can select them using the -p option

git add –p

And commit them to the repository with a commit command like:

git commit –m [message]

Alternatively you can add the commit message in your favoured editor with the difference from previous commit shown below:

git commit –a –v

I tend to use an remote repository as a backup so I regularly do:

git push origin HEAD

If someone else is working on the same repository as you then things get more complicated but that’s out of the scope of this post.

Undoing things

If you get your commit message wrong you can edit it with:

git commit --amend

If you decide you change your mind about staging a file for commit:

git reset HEAD [filename]

If you change your mind about the modifications you have made to a file since the last commit then you can revert to the last commit using this **destructive** command:

git checkout -- [filename]

You should be careful doing that since it will obliterate any changes you’ve made to a file, even if you saved them from the editor.

Working out where you are

You can list files in the repo with:

git ls-tree --full-tree -r HEAD

The general command for seeing what is going on is:

git status

This tells you if you have made edits which have not been staged, which branch you are on and files which are not being tracked. Whilst you are working you can see the difference from the previous commit using:

git diff

If you’ve already added files to commit then you need to do:

git diff –cached

You can see a list of all your changes using:

git log

This command gives you more information, in a more compact form:

git log --oneline --graph --decorate

is a good way of seeing the status of your branch and the other branches in the repository. I have aliased this log set of options as:

git lg

To do this I added the following to my ~/.gitconfig file:

[alias]
  
        lg = log --oneline --graph --decorate

Once you’ve commited a bunch of changes you might want to push them to a remote server. This pushes to the remote called origin, and HEAD ensures you push to your current branch. HEAD is Git’s shorthand for the latest commit on the current branch:

git push origin HEAD

Branches

The proceeding commands are how you’d work using a single master branch, if you were working alone on something simple, for example. If you are working with other people or on something more complicated then you probably want to work on a branch, you can make a new branch by doing:

git checkout –b [branch name]

You can find out what other branches are available by doing:

git branch –v -a

Once you are on a branch you can commit changes, and push them onto your remote server, just as if you were on the master branch.

Merging and rebasing

The excitement comes when you want to merge your changes onto the master branch or you want to get changes on your own branch made by someone else and pushed to the remote reposition. The quick and dirty way to do this is using

git pull

This does a fetch and merge all at the same time. The better way is to fetch the changes and then merge them:

git fetch –prune –all
git merge origin/master

If you are working with someone else then you may prefer to merge changes onto the master branch by making a pull request on GitHub or BitBucket.

Accepting Pull Requests from Forks

If someone makes a Pull Request based on their forked copy of a repo then you can download for testing by doing:

git fetch origin pull/ID/head:BRANCHNAME