I have recently been thinking about versioning in Python, both of Python and also of the Python packages. This is a record of how it is done for a current project and the reasoning behind it.
Python Versioning
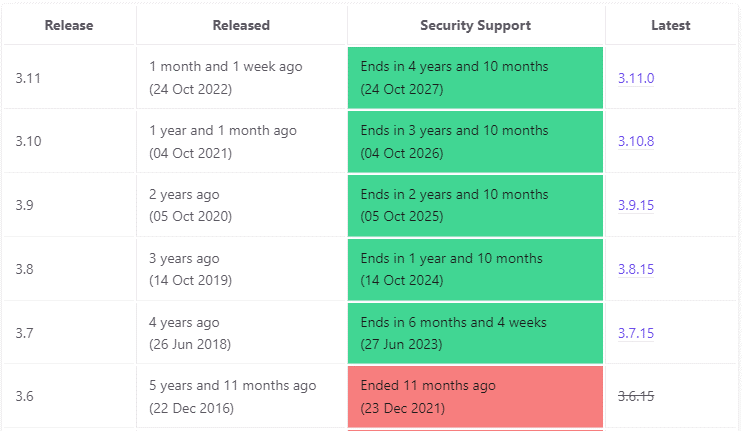
At the beginning of the project we made a conscious decision to use Python 3.9, however our package is also used by our Airflow code which does integration tests, and provides reference Docker images based on Python 3.7 (their strategy is to use the oldest version of Python still in support). This approach is documented here. And the end of life dates for recent Python versions are listed here:
Since we started the project, Python 3.11 has been released so it makes sense to extend our testing from just Python 3.9 to include Python 3.7 and 3.11 too.
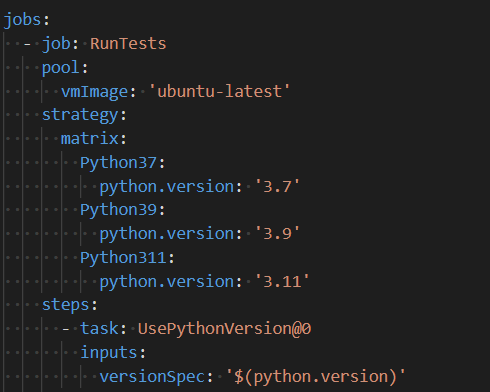
The project uses an Azure Pipeline to run continuous integration / continuous development tests, it is easy to add tests for multiple versions of Python using the following stanza in the configuration file for the pipeline.
Extending testing resulted in only a small number of minor issues, typically around Python version support for dependencies which were easily addressed by allowing more flexible versions in Python’s requirements.txt rather than pinning to a specific version. We needed to address one failing test where it appears Python 3.11 handles escaping of characters in Windows-like path strings differently from Python 3.9.
Package Versioning
Our project publishes a package to a private PyPi repository. This process fails if we attempt to publish the same version of the package twice, where the version is that specified in the “pyproject.toml”* configuration file rather than the state of the code.
Python has views on package version numbering which are described in PEP-440, this describes permitted formats. It is flexible enough to allow both Calendar Versioning (CalVer – https://calver.org/) or Semantic Versioning (SemVer – https://semver.org/) but does not prescribe how the versioning process should be managed or which of these schemes should be used.
I settled on Calendar Versioning with the format YYYY.MM.Micro. This is a considered personal taste. I like to know at a glance how old a package is, and I worry about spending time working out whether I need to bump major, minor or patch parts of a semantic version number whilst with Calendar Versioning I just need to look at the date! I use .Micro rather than .DD (meaning Day) because the day to be used is ambiguous in my mind i.e. is the day when we open a pull request to make a release or when it is merged?
It is possible to automate the versioning numbering process using a package such as bumpversion but this is complicated when working in a CI/CD environment since it requires the pipeline to make a git commit to update the version.
My approach is to use a pull request template to prompt me to update the version in pyproject.toml since this where I have stored version information to date, as noted below I moved project metadata from setup.cfg to pyproject.toml as recommended by PEP-621 during the writing of this blog post. The package version can be obtained programmatically using the importlib.metadata.version method introduced in Python 3.8. In the past projects defined __version__ programmatically but this is optional and is likely to fall out of favour since the version defined in setup.cfg/pyproject.toml is compulsory.
Should you wish to use Semantic Versioning then there are libraries that can help with this, as long as you following commit format conventions such as those promoted by the Angular project.
Once again I am struck on how this type of activity is a moving target – PEP-621 was only adopted in November 2020.
* Actually when this blog post was started version information and other project metadata were stored in setup.cfg but PEP-621 recommends it is put in pyproject.toml and is preferred by the packaging library. Setuptools has parallel instructions for using pyproject.toml or setup.cfg, although some elements to do with package and data discovery are in beta.
For a long time I have worked as a data scientist, and before that a physical scientist – writing code to do data processing and analysis. I have done some work in software engineering teams but only in a relatively peripheral fashion – as a pair programmer to proper developers. As a result I have picked up some software engineering skills – in particular unit testing and source control. This year, for the first time, I have worked as a software engineer in a team. I thought it was worth recording the new skills and ways of working I have picked up in the process. It is worth pointing out that this was a very small team with only three developers working about 1.5 FTE.
This blog assumes some knowledge of Python and source control systems such as git.
Coding standards
At the start of the project I did some explicit work on Python project structure, which resulted in this blog post (my most read by a large margin). At this point we also discussed which Python version would be our standard, and which linters (syntax/code style enforcers) we would use (Black, flake and pylint) – previously I had not used any linters/syntax checkers other than those built-in to my preferred editors (Visual Studio Code). My Python project layout used to be a result of rote learning – working in a team forced me to clarify my thinking in this area.
Agile development
We followed an Agile development process, with work specified in JIRA tickets which were refined and executed in 2 week sprints. Team members were subjected to regular rants (from me) on the non-numerical “story points” which have the appearance of numbers BUT REALLY THEY ARE NOT! Also the metaphor of sprinting all the time is exhausting. That said I quite like the structure of working against tickets and moving them around the JIRA board. Agile development is the subject of endless books, I am not going to attempt to describe it in any detail here.
Source control and pull requests
To date my use of source control (mainly git these days) has been primitive; effectively I worked on a single branch to which I committed all of my code. I was fairly good at committing regularly, and my commit messages were reasonable useful. I used source control to delete code with confidence and as a record of what I was doing when.
This project was different – as is common we operated on the basis of developing new features on branches which were merged to the main branch by a process of “pull requests” (GitHub language) / “merge requests” (GitLab language). For code to be merged it needed to pass automated tests (described below) and review by another developer.
I now realise we were using the GitHub Flow strategy (a description of source control branching strategies is here) which is relatively simple, and fits our requirements. It would probably have been useful to talk more explicitly about our strategy here since I had had no previous experience in this way of working.
I struggled a bit with the code review element, my early pull requests were massive and took ages for the team to review (partly because they were massive, and partly because the team was small and had limited time for the project). At one point I Googled for dealing with slow code review and read articles starting “If it takes more than a few hours for code to be reviewed….” – mine were taking a couple of weeks! My colleagues had a very hard line on comments in code (they absolutely did not want any comments in code!)
On the plus side I learnt a lot from having my code reviewed – often in pushing me to do stuff I knew I should have done. I also learned from reviewing other’s code, often I would review someone else’s code and then go change my own code.
Automated pipelines
As part of our development process we used Azure Pipelines to run tests on pull requests. Azure is our corporate preference – very similar pipeline systems can be found in GitHub and GitLab. This was all new to me in practical, if not theoretical, terms.
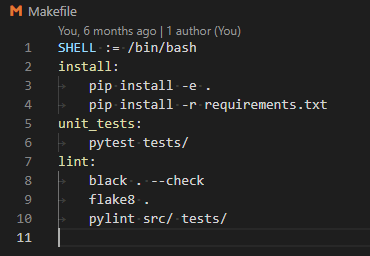
Technically configuring the pipeline involved a couple of components. The first is optional, we used Linux “make” targets to specify actions such as running installation, linters, unit tests and integration tests. Make targets are specified in a Makefile, and are involved with simple commands like “make install”. I had a simple MakeFile which looked something like this:
The make targets can be run locally as well as in the pipeline. In practice we could fix all issues raised by black and flake8 linters but pylint produced a huge list of issues which we considered then ignored (so we forced a pass for pylint in the pipeline).
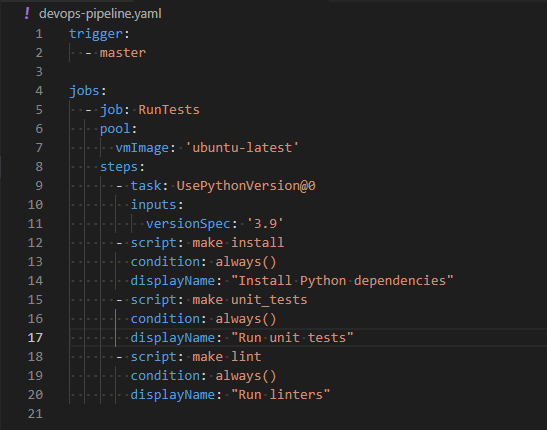
The Azure Pipeline was defined using a YAML file, this is a simple example:
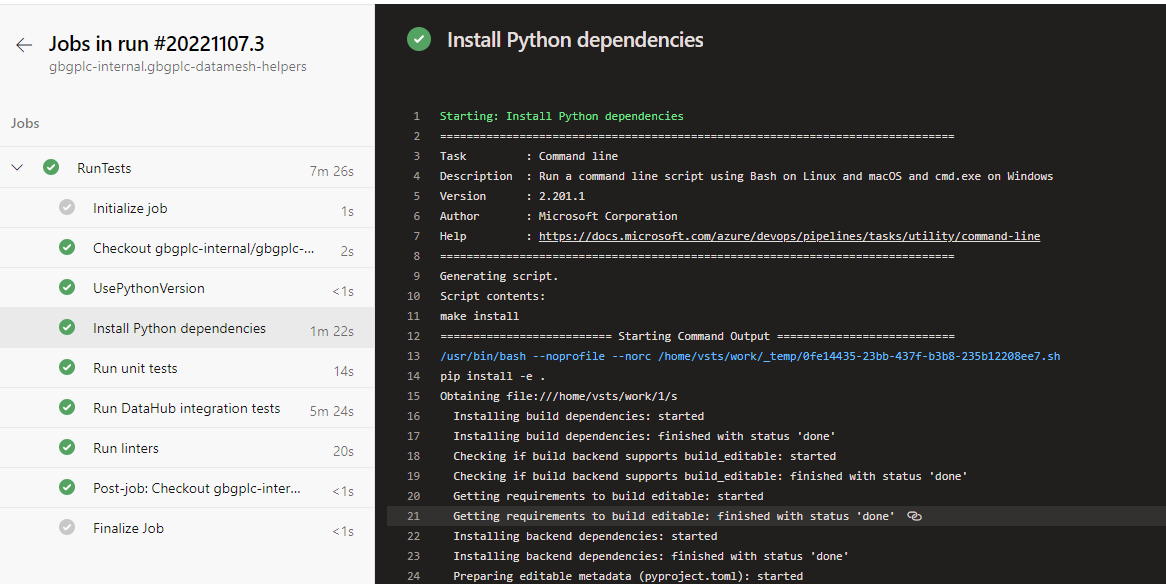
This YAML specifies that the pipeline will be triggered on attempting a pull request against a main branch. The pipeline is run on an Ubuntu image (the latest one) with Python 3.9 installed. Three actions are done, first installation of the Python package specified in the git repo, then unit tests are run and finally a set of linters is run. Each of these actions is run regardless of the status of previous actions. Azure Pipelines offers a lot of pre-built tasks but they are not portable to other providers, hence the use of make targets.
The pipeline is configured by navigating to the Azure Pipeline interface and pointing at the GitHub repo (and specifically this YAML file). The pipeline is triggered when a new commit is pushed to the branch on GitHub. The results of these actions are shown in a pretty interface with extensive logging.
The only downside of using a pipeline from my point of view was that my standard local operating environment is Windows with the git-bash prompt providing a Linux-like commandline interface. The pipeline was run on an Ubuntu image, which meant that certain tests would pass locally, but not in the pipeline, and were consequently quite difficult to debug. Regular issues were around checking file sizes (line endings mean that file sizes on Linux and Windows differ) and file paths – even with Python’s pathlib – are different between Windows and Linux systems. Using a pipeline forces you to ensure your installation process is solid, since the pipeline image is built on every run.
We also have a separate pipeline to publish the Python package to a private PyPi repository but that is the subject of another blog post.
Conclusions
I learnt a lot working with other, more experienced, software engineers and as a measure of the usefulness of this experience I have retro-fitted the standard project structure and make targets to my legacy projects. I have started using pipelines for other applications.
I am about to take on a couple of data science students from Lancaster University for summer projects, from past experience I always spend some time at the beginning of such projects explaining how I work with the expectation that they will at least take some notice if not repeat my methodology exactly. This methodology evolves slowly over time as I learn new things and my favoured technologies change.
Typically I develop on a Windows laptop but I use the git-bash prompt as my shell for typing in commands – this is a Linux-like terminal which I adopted after working with developers who mainly used Linux and also because I was familiar with the Unix style commandline from before the time on Linux. You can do a lot from the commandline in data science – Data Science at the Command Line by Jeroen Janssens is an excellent introduction.
I use Docker containers a bit to spin up local versions of services which are difficult to run on Windows (things like Airflow and Linkedin DataHub), some people develop entirely inside Docker containers to reduce dependency issues and make deployment of code easier.
I work pretty much entirely in Python for data processing and analysis although I generate CSV files which I load to Tableau for visualisation. I tend not to try complex processing in Tableau since I find the GUI inconvenient and confusing for such work. I use the Anaconda distribution of Python, originally because I liked that it came packaged with a load of useful libraries for data science and it handled virtual environments and installation of more tricky packages better than plain Python. It may be worth revisiting this decision. I have recently shifted my code to Python 3.9.
For a piece of work I will usually set up a Python project which can be “installed”. This blog post explains a standard structure for Python projects. I aim to use Python virtual environments on a per project basis but sometimes I fail. Typically, I will write Python modules that provide functions but also have a simple command line interface which takes two or three positional parameters. You can see this in action in the git repo here which I share as a template for myself and others!
To date I have picked up commandline arguments using sys.argv I should probably use one of the libraries to make these commandline interfaces better, there is a blog post here which compares the built-in argparse library with click and docopt. I think I might check out click for future projects.
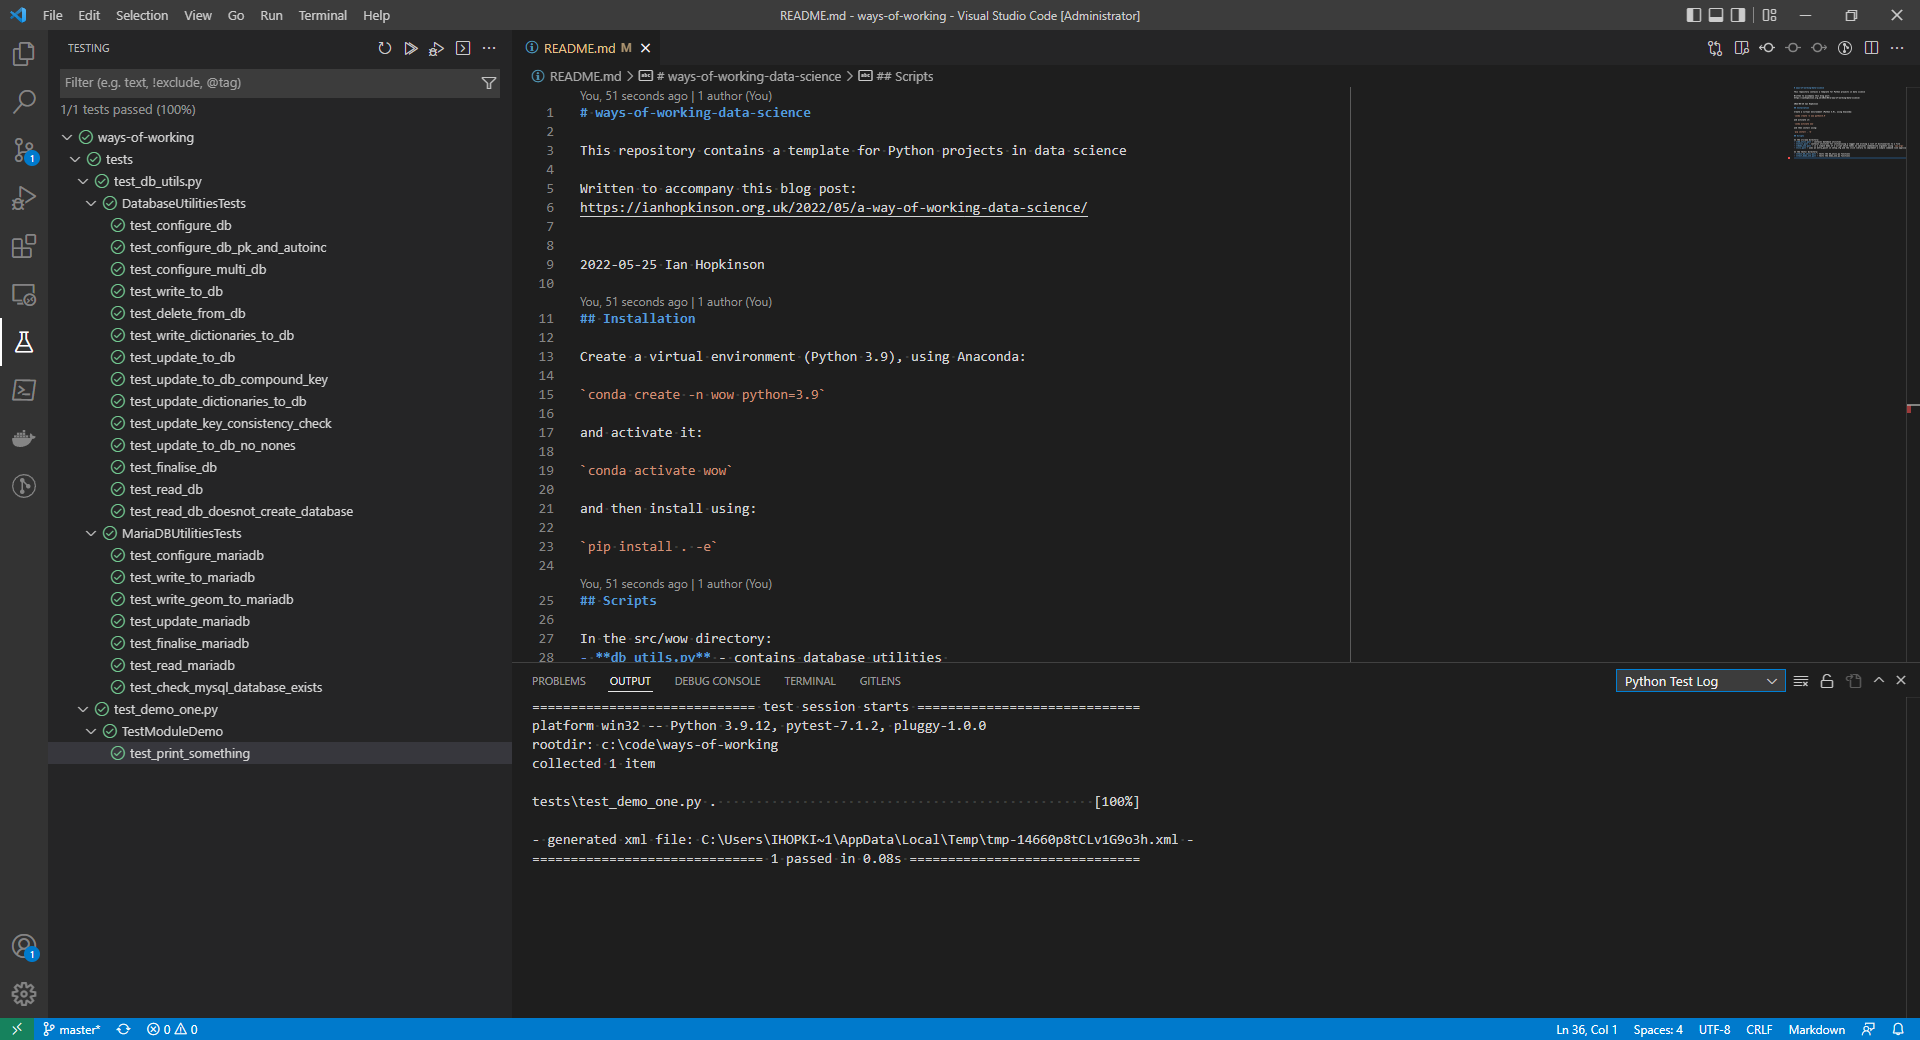
As well as running commandline scripts I use tests to develop analysis, as well as being good software development practice, test runners make a convenient way to run arbitrary functions in a code base. I prefer to use the unittest built-in library but I’ve started using pytest for a recent project. I wrote a blog post about writing tests, since I wrote it I have learned about test mocks and pytest’s fixture functionality.
I have a library of general utilities for interacting with databases, setting up logging and writing dictionaries which I wrote because I found I was doing these things repeatedly and making my own library allowed me to forgot some of the boilerplate code required to do these things. The key utilities are included with the repo attached to this blog.
I’ve been using Visual Code as my editor for some time now, I prefer not to use full blown IDEs because I find they present more functionality than I can cope with. I think this is as a result of coding in Java using Eclipse and C# .net in Visual Studio. In any case Visual Code starts as a nice enough code editor but has been sneaking in more IDE functionality via extensions.
The extensions I use heavily in Visual Code are Python and Pylance – the Python language server provides type-hinting support. I wrote about type-hinting in Python here. I also use Rainbow CSV for when I am editing or viewing CSV files.
I could use Visual Code for accessing git, my preferred source control system, but instead I use GitKraken which has a very nice GUI interface. Since I am usually working by myself my git usage is very simple, I typically have one branch onto which I make many small commits. I have recently started working with a team where I am using feature-based branches which get merged by pull requests – this was a bit of a culture shock.
As a result of working with other people on a new project I have started using some technologies which I will just mention here. I run the black formatter, as well pylint and flake8. Black just reformats my code files when I save them and can largely be ignored. Flake8 is fairly easy to satisfy although I spent a lot of time addressing line length issues. Pylint generates quite a few warnings which I attend to but sometimes ignore.
I have also started using Make files and Azure Devops pipelines for running common tasks on my code (tests, cleanup, setting up infrastructure, linting).
Outside technology, I have a very long established method of working using a monthly Word document as a notebook, I describe it here. I tend to prefix file names with ISO8601 format dates (2022-05-22) this means that if I created a Tableau workbook or an Excel worksheet I can link it easily to what I was writing in my notebook and the status of the appropriate git repo at that point in time.
I’ve incorporated all the code related elements mentioned above in this ways-of-working-data-science git repository.
This blog post is designed to clarify my thinking around installing Python packages and the use of setup.py, setup.cfg and pyproject.toml files. Hopefully it will be a useful reference for other people, and future me.
It is stimulated by my starting work on a new project where we have been discussing best practices in Python programming, and how to layout a git repository containing Python code. More broadly it is relevant to me as someone who programmes a lot in Python, mainly for my own local use, but increasingly for other people to consume my code. Prior to writing this the layout of my Python repositories was by a system of random inheritance dating back a number of years.
The subject of Python packaging, installation and publication is a bit complicated for mainly historic reasons – the original distutils module was created over 20 years ago. A suite of tools have grown up either as part of the standard library or de facto standards, and have evolved over time. Some elements are contentious in the sense that projects will have lengthy arguments over whether or not to support a particular method of configuration. A further complication for people whose main business is not distributing their code is that it isn’t necessarily at the start of a project and may never be relevant.
Update: I have updated this blog post 5th May 2023, the change is that project settings formerly in setup.cfg can now go in pyproject.toml, as per PEP-621 – described in more detail in the PyPA documentation. Currently I only use setup.cfg for flake8 configuration. A reader from Mastodon commented that setup.py is not required for installation of a package but is required for build/publication.
tl;dr
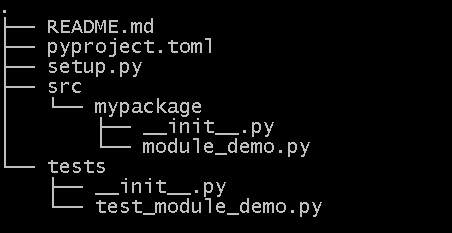
Structure your Python project like this with setup.py and pyproject.toml in the top level with a tests directory and a src directory with a package subdirectory inside that:
The minimal setup.py file simply contains an invocation of the setuptools setup function, if you do not intend to publish your project then no setup.py file is required at all, pip install -e . will work without it:
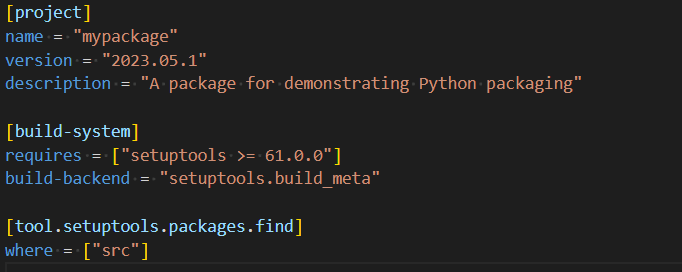
Setup.cfg is no longer required for configuring a package but third-party tools may still use it. Put at least this in pyproject.toml:
Then install the project locally:
pip install -e .
If you don’t do this “editable installation” then your tests won’t run because the package will not be installed. An editable install means that changes in the code will be immediately reflected in the functionality of the package.
It is common and recommended practice to use virtual environments for work in Python. I use the Anaconda distribution of Python in which we setup and activate a virtual environment using the following, to be run before the pip install statement
But why should we do it this way? It is worth stepping back a bit and defining a couple of terms:
module – a module is a file containing Python functions.
package – a package is a collection of modules intended to be installed and used together.
Basically this blog post is all about making sure import and from ... import ... works in a set of distinct use cases. Possibilities include:
Coding to solve an immediate problem with no use outside of the current directory anticipated – in this case we don’t need to worry about pyproject.toml, setup.cfg, setup.py or even __init__.py.
Coding to solve an immediate problem with the potentially to spread code over several files and directories – we should now make sure we put an empty __init__.py in each directory containing module files.
Coding to provide a local library to reuse in other projects locally this will require us to run python setup.py develop or better pip install -e .
Coding to provide a library which will be used on other systems you control again using pip install -e .
Coding to provide a library which will be published publicly, here we will need to additionally make use of something like the packaging library.
I am primarily interested in cases 3 and 4, and my projects tend to be pure Python so I don’t need to worry about compiling code. More recently I have been publishing packages to a private PyPI repository but that is a subject for another blog post.
The setup.py and setup.cfg files are artefacts of the setuptools module which is designed to help with the packaging process. It is used by pip whose purpose is to install a package either locally or remotely. If we do not configure setup.py/setup.cfg correctly then pip will not work. In the past we would have written a setup.py file which contained a bunch of configuration information but now we should put that configuration information into setup.cfg which is effectively an ini format file (i.e. does not need to be executed to be read). This is why we now have the minimal setup.py file.
It is worth noting that setup.cfg is an ini format file, and pyproject.toml is a slightly more formal ini-like format.
What is pyproject.toml?
The pyproject.toml file was introduced in PEP-518 (2016) as a way of separating configuration of the build system from a specific, optional library (setuptools) and also enabling setuptools to install itself without already being installed. Subsequently PEP-621 (2020) introduces the idea that the pyproject.toml file be used for wider project configuration and PEP-660 (2021) proposes finally doing away with the need for setup.py for editable installation using pip.
Although it is a relatively new innovation, there are a number of projects that support the use of pyproject.toml for configuration including black, pylint and mypy. More are listed here:
Tests go in a tests directory at the top-level of the project with an __init__.py file so they are discoverable by applications like pytest. The alternative of placing them inside the src/mypackage directory means they will get deployed into production which may not be desirable.
Why put your package code in a src/ subdirectory?
Using a src directory ensures that you must install a package to test it, so as your users would do. Also it prevents tools like pytest incidently importing it.
Conclusions
I found it a useful exercise researching this blog post, the initial setup of a Python project is something I rarely consider and have previously done by rote. Now I have a clear understanding of what I’m doing, and I also understand the layout of Python projects. One of my key realisations is that this is a moving target, what was standard practice a few years ago is no longer standard, and in a few years time things will have changed again.
I’ve been working on a proof of concept project at work, and the time has come to convert it into a production system. One of the things it was lacking was documentation, principally for the developers who would continue work on it. For software projects there is a solution to this type of problem: automated documentation systems which take the structure of the code and the comments in it (written in a particular way) and generate human readable documentation from it – typically in the form of webpages.
For Python the “go to” tool in this domain is Sphinx.
I used Sphinx a few years ago, and although I got to where I wanted in terms of the documentation it felt like a painful process. This time around I progressed much more quickly and was happier with the results. This blog post is an attempt to summarise what I did for the benefit of others (including future me). Slightly perversely, although I use a Windows 10 laptop, I use Git Bash as my command prompt but I believe everything here will apply regardless of environment.
There are any number of Sphinx guides and tutorials around, I used this one by Sam Nicholls as a basis supplemented with a lot of Googling for answers to more esoteric questions. My aim here is to introduce some pragmatic solutions to features I wanted, and to clarify some thing that might seem odd if you are holding the wrong concept of how Sphinx works in your head.
I was working on a pre-existing project. To make all of the following work I ran “pip install …” for the following libraries: sphinx, sphinx-rtd-theme, sphinx-autodoc-typehints, and m2r2. In real life these additional libraries were added progressively. sphinx-rtd-theme gives me the the popular “Readthedocs” theme, Readthedocs is a site that publishes documentation and the linked example shows what can be achieved with Sphinx. sphinx-autodoc-typehints pulls in type-hints from the code (I talked about these in another blog post) and m2r2 allows the import of Markdown (md) format files, Sphinx uses reStructuredText (rst) format by default. These are both simple formats that are designed to translate easily into HTML format which is a pain to edit manually.
With these preliminaries done the next step is to create a “docs” subdirectory in the top level of your repository and run the “sphinx-quickstart” script from the commandline. This will ask you a bunch of questions, you can usually accept the default or provide an obvious answer. The only exception to this, to my mind, is when asked “Separate source and build directories“, you should answer “yes“. When this process finishes sphinx-quickstart will have generated a couple of directories beneath “docs“: “source” and “build“. The build directory is empty, the source directory contains a conf.py file which contains all the configuration information you just provided, an index.rst file and a Makefile. I show the full directory structure of the repository further down this post.
I made minor changes to conf.py, switching the theme with html_theme = ‘sphinx_rtd_theme’, and adding the extensions I’m using:
In the past I added these lines to conf.py but as of 2022-12-26 this seems not to be necessary:
import os
import sys
sys.path.insert(0, os.path.abspath('..'))
This allows the Sphinx to “see” the rest of your repository from the docs directory.
The documentation can now be built using the “make html” command but it will be a bit dull.
In order to generate the documentation from code a command like: “sphinx-apidoc -o source/ ../project_code“, run from the docs directory will generate .rst files in the source directory which reflect the code you have. To do this Sphinx imports your code, and it will use the presence of the __init__.py file to discover which directories to import. It is happy to import subdirectories of the main module as submodules. These will go into files of the form module.submodule.rst.
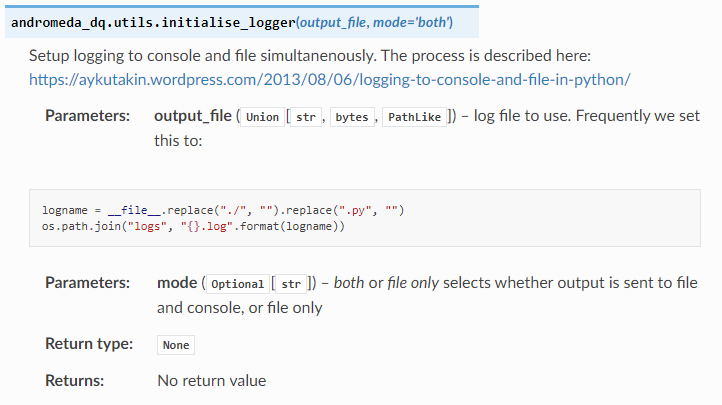
The rst files contain information from the docstrings in your code files, (those comments enclosed in triple double-quotes “””I’m a docstring”””. A module or submodule will get the comments from the __init__.py file as an overview then for each code file the comments at the top of the file are included. Finally, each function gets an entry based on its definition and some specially formatted documentation comments. If you use type-hinting, the sphinx-autodoc-typehints library will include that information in documentation. The following fragment shows most of the different types of annotation I am using in docstrings.
def initialise_logger(output_file:Union[str, bytes, os.PathLike], mode:Optional[str]="both")->None:
    """
    Setup logging to console and file simultanenously. The process is described here:
    Logging to Console and File In Python

    :param output_file: log file to use. Frequently we set this to:
    .. highlight:: python
    .. code-block:: python

            logname = __file__.replace("./", "").replace(".py", "")
            os.path.join("logs", "{}.log".format(logname))

    :param mode: `both` or `file only` selects whether output is sent to file and console, or file only

    :return: No return value
    """
My main complaint regarding the formatting of these docstrings is that reStructuredText (and I suspect all flavours of Markdown) are very sensitive to whitespace in a manner I don’t really understand. Sphinx can support other flavours of docstring but I quite like this default. The docstring above, when it is rendered, looks like this:
In common with many developers my first level of documentation is a set of markdown files in the top level of my repository. It is possible to include these into the Sphinx documentation with a little work. The two issues that need to be addressed is that commonly such files are written in Markdown rather reStructuredText. These can be fixed by using the m2r2 library. Secondly the top level of a repository is outside the Sphinx source tree, so you need to put rst files in the source directory which include the Markdown files from the root of the repository. For the CONTRIBUTIONS.md file the contributions.rst file looks like this:
.. mdinclude:: ../../CONTRIBUTIONS.md
Putting this all together the (edited) structure for my project looks like the following, I’ve included the top-level of the repository which contains the Markdown flavour files, the docs directory, where all the Sphinx material lives, and stubs to the directories containing the module code, with __init__.py files.
The index.rst file pulls together documentation in other rst files, these are referenced by their name excluded the rst extension (so myproject pulls in a link to myproject.rst). By default the index file does not pull in all of the rst files generated by apidoc, so these might need to be added (specifically the modules.rst file). The index.rst file for my project looks like this, all I have done manually to this file is add in overview, installation, usage, contributions and modules in the “toctree” section. Note that the indentation for these file imports needs to be the same as for the preceding :caption: directive.
.. Andromeda Data Quality documentation master file, created by
   sphinx-quickstart on Wed Sep 15 08:33:59 2021.
   You can adapt this file completely to your liking, but it should at least
   contain the root `toctree` directive.

Andromeda Data Quality
======================

Documentation built using Sphinx. To re-build run `make html` in the `docs`
directory of the project.

The OVERVIEW.md, INSTALLATION.md, USAGE.md, and CONTRIBUTIONS.md files are imported
from the top level of the repo.

Most documentation is from type-hinting and docstrings in source files.

.. toctree::
   :maxdepth: 3
   :caption: Contents:

   overview
   installation
   usage
   contributions
   modules


Indices and tables
==================

* :ref:`genindex`
* :ref:`modindex`
* :ref:`search`
The (edited) HTML index page for the documentation looks like this:
For some reason Sphinx puts the text in the __init__.py files which it describes as “Module Contents” at the bottom of the relevant package description, this can be fixed by manually moving the “Module contents” section to the top of the file in the relevant package rst file.
There is a little bit of support for Sphinx in Visual Code, I’ve installed the reStructuredText Syntax highlighting extension and the Python Sphinx Highlighter extension. The one thing I haven’t managed to do is automate the process of running “make html” either on commit of new code, or when code is pushed to a remote. I suspect this will be one of the drawbacks in using Sphinx. I’m getting a bit better at adding type-hinting and docstrings as I code now.
If you have any comments, or suggestions, or find any errors in this blog post feel free to contact me on twitter (@ianhopkinson_).