Category: Technology

Programming, gadgets (reviews thereof) and computers

Windows 8 and Ubuntu 12.10 on a Sony Vaio T13 laptop

I wanted to dual boot my new Sony Vaio T13 laptop with Windows 8 and Ubuntu 12.10, as it turned out I found it challenging to setup a true dual boot but I have a satisfactory solution.

This process is not straightforward because the T13 uses the Insyde H2O UEFI instead of a old-style BIOS furthermore since  Windows 8 was pre-installed SecureBoot is switched on, these factors mean that only the most recent, 64-bit version of Ubuntu (12.10) has any chance of installing. Also the T13 has no optical drive so I would need to boot from a USB memory stick.

I’ve installed various Linux distributions over the years but they tend not to be my primary OS, I considered three methods for this operation.

Method 1 – install using Wubi

The Wubi installer is a way of installing a Linux distribution effectively as an application in Windows but apparently this doesn’t work because of incompatibilities in with UEFI. I’ve used Wubi in the past – I like it because it reduces the chances of me rendering my Windows install inoperative via a partitioning mistake.

Method 2 – conventional dual boot installation

As of the 64-bit 12.10 version of Ubuntu it should be possible to do a fairly conventional dual boot installation of Ubuntu onto a machine preloaded with Windows 8. The instructions for this are here, essentially they are:

1. Download the appropriate ISO

2. Transfer the ISO to a USB stick using Universal USB Installer

3. Boot from the USB stick (Shift-restart in Windows 8 gives you lots of options for the necessary fiddling to achieve this)  and follow the installation instructions (here).

However when I did this I kept getting this error:

(initramfs) unable to find a medium containing a live file system.

This error persisted through various combinations of enabled/disabled SecureBoot and boot orderings. I don’t know why this doesn’t work, I suspect that the Universal USB Installer is not creating an appropriate boot device perhaps if I flagged the USB drive as legacy rather than UEFI it might work. I was feeling slightly nervous about this because there were some indications (here) that if I had succeeded in producing a new disk partition for Ubuntu then I may have lost my Windows partition! Doing clean installs of both Windows 8 and Ubuntu onto a machine looks like it might be a bit simper (here).

Maybe I should have followed the instructions here, the trick seems to be to create your Ubuntu partition using Windows 8 rather than trying to do it with the Ubuntu installer.

In some ways the problem here is finding an excess of instructions!

Method 3 – install on a virtual machine

Following a suggest on twitter my third method was to try installing Ubuntu onto a virtual machine inside Windows 8, if I’d have splashed out on Windows 8 Pro then I could have used Hyper-V as my virtual machine. However, I’m using VirtualBox. The instructions for installing Ubuntu inside VirtualBox  are here, I switched on hardware virtualization support which was disabled by default.

This worked pretty smoothly, you don’t even need to produce a USB stick from which to boot, simply mount the ISO you downloaded as a virtual optical drive in VirtualBox. After initial installation Ubuntu was rather slow and unresponsive, I think this might have been due to downloading updates but I’m not sure. The only problem was that Ubuntu inside the VirtualBox couldn’t display at full screen resolution. This problem should be fixed by installing “Guest Additions” – this is software that lives on the guest operating system (the one inside the VirtualBox) and helps it interface with the host operating system. You can install the Guest Additions from an ISO image supplied with VirtualBox, the instructions for this are here. I failed to do this by not reading the instructions, in particular I didn’t install Dynamic Kernel Module Support (DKMS) properly. This was a recoverable mistake though, I learnt here that I needed to do this commandline first:

sudo apt-get install build-essential linux-headers-$(uname -r)

and then I re-installed using this commandline:

sudo apt-get install virtualbox-guest-utils

And it worked nicely on rebooting the virtual machine. So now I have Ubuntu 12.10 running in a VirtualBox inside Windows 8 aside from a hint of the VirtualBox menu bar at the bottom of the screen I could just as well be dual booting. Theoretically I might experience reduced performance by not running Ubuntu natively but I have 8GB of RAM in my laptop and an i7 processor so I suspect this won’t be an issue.

Now my eyes have been opened to the magic of virtual machines I want to install more! Sadly Apple’s OS X is not supported for such ventures.

I don’t claim to be an expert in this sort of thing so any comments on my understanding and technique are welcome!

Update

The Ubuntu in the virtual machine doesn’t find my monitor resolution (1920×1080), so I apply this fix (link)

Also I use this technique, adding vboxvideo to modules, to improve performance (link).

Possibly I need to do this thing in the host machine (link):

VBoxManage setextradata global GUI/MaxGuestResolution any

Industrial collaboration agreements: bald men fighting over a comb?

This piece was originally published on the ALDES website:


The Samsung-Apple patent battle brings to light an area of intellectual activity of which my more academic colleagues are probably little aware. As an industrial scientist the value of a project is not measured by the number of papers published in peer reviewed literature or even in our own internal literature; it is measured, amongst other things, by the number of patents it has produced. Starting out on a project, the intellectual property landscape investigated and remains critical throughout. Scientific work to defend patents in legal actions is top priority, and in this there is the thrill of the chase – the positive feedback for winning a patent litigation case is immediate. The bottom line is that any patent attorney is paid more than pretty much any scientist!

The idea of a patent is that it gives the holder a period of exclusivity for their invention during which they can exploit it commercially, the benefit to society is that the knowledge that might have been locked into a company is made public for all to see. Without patents, why do research? You might spend millions to invent something but once you’ve invented it, in the absence of a patent, a competitor could exploit your invention at little cost to themselves. Alongside patents you can protect your intellectual property using registered designs, trademarks or you may attempt to keep your invention a “trade secret”.

Patents have a long history, they originated in Italy in the 15th century, with the first formal modern patent law in England the Statute of Monopolies in 1624. In England this replaced a more widespread system of “patent letters” which gave groups of craftsmen monopolistic rights to practice their trade. The 1624 statute swept this away and replaced it with a system of patents which protected specific inventions.

Reading the history of science one frequently comes across references to patents. For example, Chester Hall Moor invented the achromatic eyepiece for telescopes sometime in the 1730s. His solution requires two lenses made of different types of glass to be used together, he commissioned two different opticians to make these two lenses, so as not to give the game away. His idea worked but, perhaps surprisingly for someone who was a barrister by profession, he chose not to patent his invention but appears to have told a couple of instrument-makers the details. They made little of the invention but in 1758 John Dollond “re-discovered” the technique, helped by a coincidence: when Hall commissioned two different opticians to make his lenses, they sub-contracted to the same man to whom Dollond spoke during his own research apparently, picking up vital clues.

John Dollond was awarded the patent for the achromatic lens in April 1758. This patent was subsequently challenged by opticians who realised that Dollond had a valuable invention that was taking business from them and, following some research, discovered the significant “prior art”originating with Chester Moor Hall. John Dollond died in 1761, but his son Peter continued to litigate, successfully, against competitors infringing the patent bringing some of them to bankruptcy.

Christiaan Huygens patented the pendulum clock in 1657. Soon after he was in dispute with Robert Hooke over the invention of the spring driven clock, ultimately no patent was awarded here. James Watt protected his invention of the steam engine with separate condenser, which was extended in term by an act of parliament – a hard fought battle won with the support of his business partner, Matthew Boulton.

Albert Einstein, more famous for his work in theoretical physics, had approximately 50 patents to his name, most notably for a refrigerator which he patented with his former student Leó Szilárd.This isn’t as surprising as it first seems, Einstein was capable as an experimental scientist, and familiar with the patenting process from his time in the Patent Office. It is notable that I’ve struggled to find a list of Einstein’s patents, finding a list of his scientific publications is trivial.

This piece of contemporary research gives an insight into the patenting behaviour of academics in the Mechanical and Electrical Engineering and Computer Science departments at MIT, it finds that 10-20% of the academics in these departments filed patents in any one year, and over half filed no patents in a 15 year period. Interviews showed that even in the 10-20% of academics filing patents, this was far from a core activity: often they were pushed into it by visiting scientists or industrial collaborators. In my view the figure of 10-20% is actually pretty high when compared with the experience I had as an academic scientist over 10 years. The research also found that corporations who collaborated with academics to publish papers were a distinct group from those who collaborated to produce patents. Although there was no correlation between numbers of papers that an academic produced and the number of patents, academics who patented published more highly cited papers.

This contrast in patenting behaviour between past and present is a little forced; prior to the 20th century there was little in the way of university science departments with salaried researchers supported by grants. A researcher might be able to support his work by private means, patronage or bodies such as the Royal Society or Royal Institution but in the absence of these commercial exploitation via patents was the way to get income from your scientific work.

More recently universities have started to create technology transfer officers with the view to exploiting patents generated internally – in the US this was driven by the Bayh-Dole Act, which gave researchers the right to patent intellectual property arising from federally-funded research. These changes can lead to lengthy negotiations over research contracts with industrial partners; the industrial partner will fight for ownership of intellectual property generated and, on behalf of the researcher, so will the university knowledge transfer office. This can lead to the appearance of bald men fighting over a comb; I was once involved in a PhD project where getting the contract signed took as long as the PhD, in an area where none of the scientists involved had a serious expectation of generating anything patentable!

References
1. The achromatic eyepiece story is from Stargazer: The life and times of the telescope by Fred Watson.

The Milky Way

Milky Way

The Milky Way (Canon 600D, 18mm, ISO6400, 30s, f/4.5)

Regular readers will know I recently bought myself a telescope, a Celestron 5SE Schmidt-Cassegrain reflector but this post covers some astrophotography conducted without the aid of a telescope almost the opposite in fact. I’ve been on holiday recently to somewhere with pretty good dark skies, unfortunately I did not have my telescope with me but I did have a tripod, a Canon 600D SLR and a collection of lenses although in this instance I just used the 18-55mm kit lens at the wide end (18mm). I also had my planisphere and a copy of the free planetarium software, Stellarium.

I’ve used my camera with a standard lens to take photos of the night sky before: to make star trails, so far my experiments in this area have been a bit disappointing. The aim with star trail photographs is to have nice bright trails showing the apparent motion of stars around the pole as the earth rotates, against a dark background. In my experiments I used 30s exposures at f/4, ISO200 on a 10mm lens which I then combined using a simple application called StarTrails.

Back to my holiday snaps – I started my evening taking photos as I had done for my star trails, I have to say this was all a bit disappointing – individual photos do show the stars in the sky and with some effort one can trace out the patterns of the constellations – you might just be able to spot Cassiopeia in the image below.

Towards Cassepoia

Cassiopeia (Canon 600D, 18mm, ISO200, 30s, f/4.5)

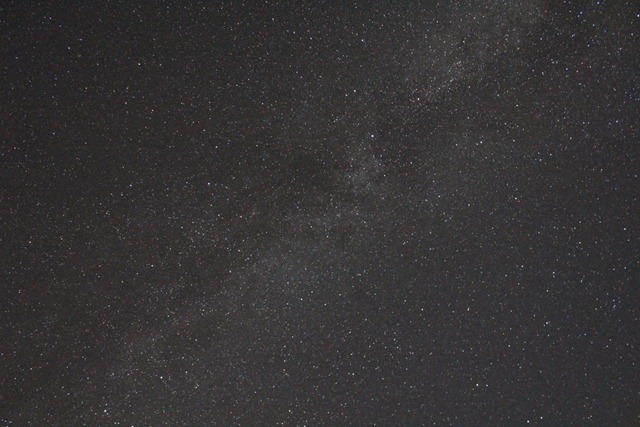
Getting a bit bored with this, I turned the sensitivity right up so I was imaging at f/4.5 ISO6400 with 30s exposures and suddenly this popped out:

Towards Casseopia

The Milky Way towards Cassiopeia (Canon 600D, 18mm, ISO6400, 30s, f/4.5)

Cassiopeia is in there somewhere but there are just so many more stars (and a few clouds). This opened the flood gates and I indiscriminately fired off shots along the line of the Milky Way, just visible in the image above. At this time of year, in the early evening in the UK the Milky Way goes from horizon to horizon passing almost directly overhead starting a little East of North and finishing a little West of South.

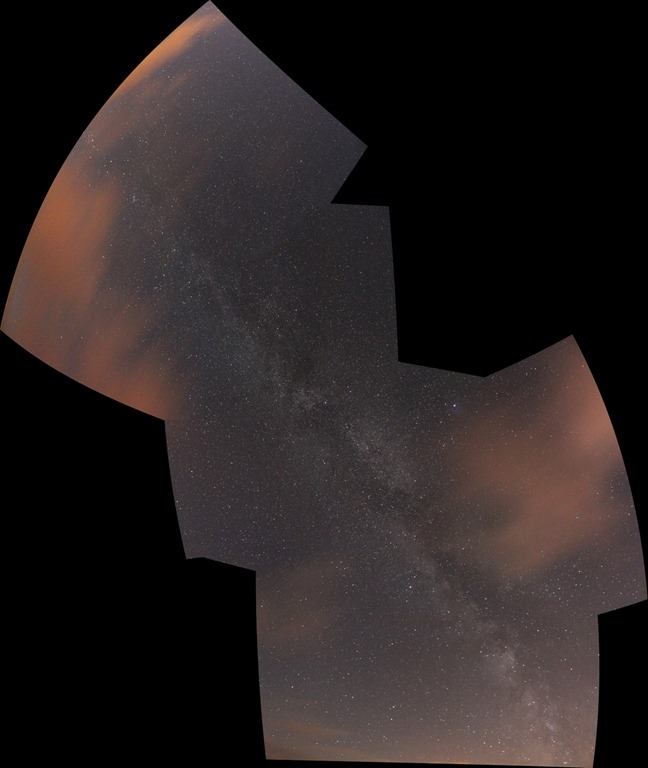
Now this is fun but now I have a bunch of images of parts of the Milky Way. Can I stick them together? It turns out I can, I used Microsoft ICE on the images I had acquired and got this mosaic:

Milk Way Composite

The Milky Way, 5 image mosaic prepared in Microsoft ICE (Canon 600D, 18mm, ISO6400, 30s, f/4.5)

This spans almost horizon to horizon. I was rather pleased with this, however I struggled to work out where I was in the sky, picking out constellations from the huge mess of stars is very tricky. It turns out help is at hand in the form of astrometry.net, this is an online service which takes an image of the night sky and works out which bit of the sky it shows and labels it all nicely. It can’t handle the mosaic image shown above, but can handle the individual images – you can see my images here. One of the formats in which data is provided is Google Earth’s KMZ format, so you can see the images projected onto the celestial sphere in Google Earth – my combined KMZ file is here, it’s 12MB.

There are improvements to be made in the process:

  • if I’d had it with me my 10-22mm lens would have been nice – it would give me more sky in one shot;
  • better familiarity with my planisphere would mean less indiscriminate firing off of shots;
  • ideally I’d have gone for a cloudless night;
  • there’s a bit of optimisation on the exposure settings, ISO6400 is at the limit of my camera and if you zoom right in there is some evidence of colour noise, also towards the zenith the stars are motion smeared – as in star trail pictures so shorter exposures would be nice;
  • compositionally it would be good to include some of the earthly scenery;
  • working out how to turn off the security lights of the holiday cottage we were staying in would have been good.

All in all a rather fun evening!

Sharepoint–how do I hate thee?

Sharepoint is Microsoft’s document sharing and collaboration tool. It allows you to share and manage documents, and to build websites – so it’s a content management system too. For work I am strapped to the mast of Sharepoint: we need to share files across the world, previously we used shared network drives, as a byproduct individual teams can also create websites. There are close on 100,000 of us.

The file sharing/content management schizophrenia can lead to horrible websites, on a normal website you might expect that following a link in a page will take you seamlessly to another web page to be rendered in your browser. Not in Sharepoint: the siren voice of the file sharing side means that all to often website authors are going to link you to documents – so you hit a link and if you’re lucky you get asked whether you want to open a document in Microsoft Office, if you’re unlucky you get asked to enter your credentials first. Either way it breaks your expectation as to what a website should do: hit link – go to another webpage.

For every function you can imagine Sharepoint has a tick in the box:

  • Blogging – tick.
  • Social media – tick.
  • Wiki – tick.
  • Discussion forums – tick.
  • Version control – tick.

The problem is that whilst it nominally ticks these boxes it is uniformly awful at implementing them. I’ve used WordPress and Blogger for blogging, phpBB for discussion forums, moinmoin and Project Forum wiki software, source control software, twitter, delicious, bit.ly, Yammer for social media and in comparison Sharepoint’s equivalent is laughable.

This ineptitude has spawned a whole industry of companies plugging the gaps.

Sharepoint does feature some neat integration into Microsoft Office: viewing shared calendars in Outlook, saving directly to Sharepoint from office application but this facility is a bit flakey – Office will try to auto-populate a "My SharePoint sites" area but does it via a cryptic set of rules which can’t be relied on to give you access to all of your sites.

For the technically minded part of the problem is the underlying product but part of the problem is down to how your company decides to implement Sharepoint. My WordPress-based site looks pretty much how I want it, bar the odd area where my CSS-fu has proved inadequate. In a corporate Sharepoint environment other people’s design decisions are foisted upon me, although Sharepoint’s underlying design often seems to be the root of the problem

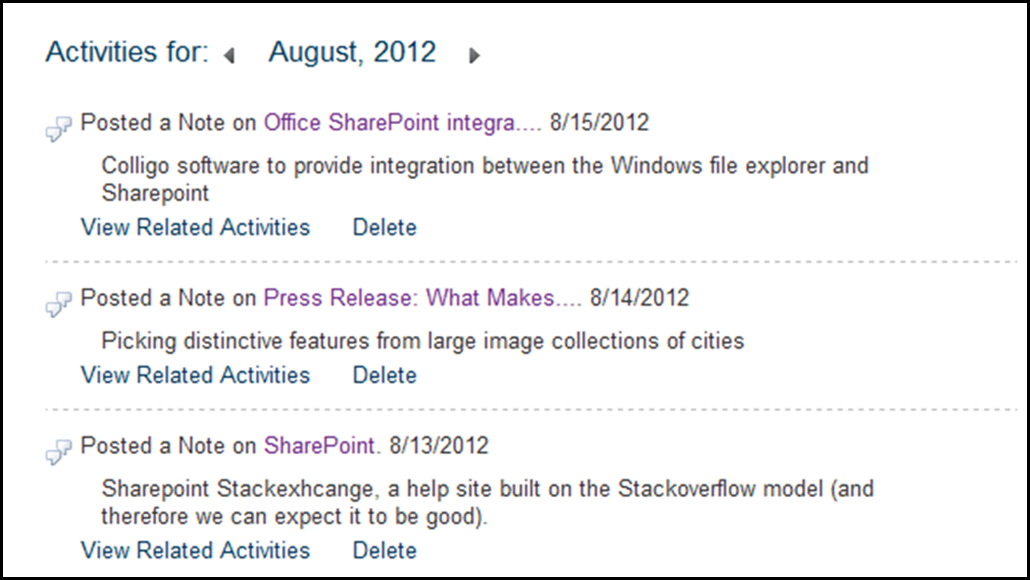
Take this piece of design (shown below), this is part of the new Sharepoint social media facilities but it’s ugly as sin, most of what you see for each Note is Sharepoint boilerplate (Posted a note on – View Related Activities – Delete) rather than your content, furthermore I have repeatedly set my dates to format dd/mm/yyyy in the UK style and this part of my site remains steadfastly on the US mm/dd/yyyy format.

NastySharepointDesign

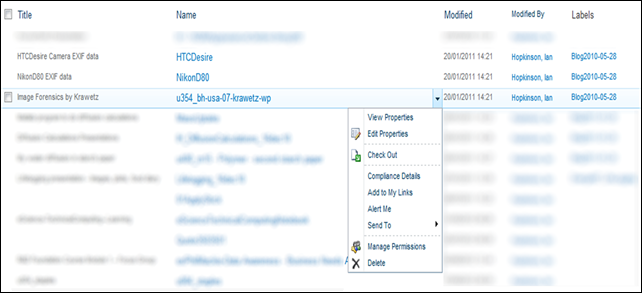
Here’s another nasty piece of design.The core of the document sharing facility is the Document Library, below is a default view of one of my libraries (with some blurring). All of the Sharepointy magic for a document is run off a dropdown menu accessed via a small downward pointing triangle on the "Name" field, the little triangle is only visible when you float over that particular line, note also that if you click on the name in the name field then that takes you to the document – so you trigger two different behaviours in one field.

NastySharepointDocumentLibraryBlurred

Other items in this table are hyperlinks but take you to entirely uninteresting content.

It didn’t have to be this way, the Document Library could functionality could have been integrated into the Windows File Explorer. Applications like the source control software TortoiseSVN and TortoiseHG do this, putting little overlays onto file icons and providing functionality via the right click menu. Windows 7 even has a panel at the bottom of the screen which seems to offer quasi-Sharepoint functionality – you can set tags for documents which could map to the "properties" that Sharepoint uses.

Users are familiar with the file explorer, Sharepoint discards that familiarity for a new, clunky web-based alternative. Furthermore users sharing files are often moving from a directory-based shared hard-drive scheme, Sharepoint allows you to use directories in Document Libraries but it breaks the property-based view which is arguably a better scheme but forcing users over to it wholesale is unreasonable.

In summary: Sharepoint suffers from trying to be a system to share documents and a system for making websites. It features a poor web interface for functionality which could be integrated into the Windows file explorer.

Celestron NexStar 5Se – a 125mm reflecting telescope

CelestronNexStar5SEThis is a brief overview of my shiny new purchase: a Celestron NexStar 5SE telescope. As an experiment I have also embedded a video review (here), I should also point out that so far cloud cover has meant the only celestial object I have observed is the sun (using the appropriate safety measures).

I bought my ‘scope from Sherwood’s, who I am happy to recommend for their good prices, and quick and efficient service. My purchase list was as follows:

  • Celestron NexStar 5SE (with mains adaptor)
  • SLA AstroPower station 12v 7Ah battery pack
  • Piggyback mount for my Canon 400D SLR
  • Universal camera adaptor and T-mount for similar
  • Moon filter
  • Baader solar filter film

The mount is powered, the add-on battery pack seemed like the best option for providing that power conveniently. I have a Canon 400D SLR camera which I wanted to use with the telescope, the piggyback mount lets me put the camera on top of the optical tube and simply use it to point the camera at the sky. The T-mount assembly allows me to use the telescope as a camera lens, albeit without auto-focus and aperture.

The solar filter is essential if you want to look at the sun, and I got the impression a moon filter was useful for dimming the brightness of the moon, photographers will know that when photographing the moon the exposure time is as if for a rock sitting in full sun, which is exactly what it is!

The 5SE is a Schmidt-Cassegrain telescope with a 125mm (5 inch) primary mirror, a focal length of 1250mm and an overall F/ratio of 10. “Schmidt-Cassegrain” means that the open end of the tube has a corrector plate (Schmidt’s contribution) and light is focussed by a large concave primary mirror and a smaller convex secondary mirror in the centre of the corrector plate. The image is viewed through an eyepiece in the back of the optical tube, behind the primary mirror. In practical terms it also means the telescope has a very short tube length making it more portable than similarly specified telescopes. The whole assembly is easy to pick up and carry in its deployed state, and the optical tube in particular was well-packed on delivery forming the basis of a useful carrycase.

The telescope is supplied with a 25mm focal length eyepiece which gives a magnification of x50, the maximum useful magnification of the telescope should be x300 with appropriate eyepiece. Focus is achieved by turning a knob on the back plane of the telescope tube, which moves the primary mirror. The eyepiece is attached to a periscope (Star Diagonal in Celestron’s parlance) to give a more comfortable viewing position. The finderscope is a Celestron Star Pointer, which is a non-magnifying window with an LED spot projected to the middle for guiding, it took me a little while to get the hang of this but I can see the benefit of a low magnification finderscope.

The telescope is on a computerized alt-azimuth mount which also includes an equatorial wedge (like the equatorial platform), meaning that the rotational motion of the mount can be made co-axial with that of the earth – allowing un-rotated tracking of objects through the sky for astrophotographic purposes. The controller is a handset device on a cord, in night time operation the telescope can be aligned to the night sky by pointing it to three different stars, after which it will goto any one of a huge catalogue of celestial objects selected using the handset.

The optical tube feels nice and chunky, although the finderscope is a bit plasticky. The piggyback mount attaches using the same mounting holes as the finderscope, the finderscope then bolts back on top, I did a bit of tweaky of the screws along with adjustments on the finderscope to get it aligned. I have achieved fine views of my neighbours chimney pot!

There is a battery compartment in the mount which takes 8xAA batteries, reading on the internet I understand the lifetime for this set is about 30 minutes in operation, which is why I got both a mains adaptor and a 3rd party battery pack. I suspect I’ll mainly use the add-on battery pack for the convenience of fewer trailing leads. The mount doesn’t operate without power, which is a bit of a drawback, the telescope can be tilted but not rotated. The mount sits on top of a nice chunky tripod, to which it is attached by three screws, so in principle you could make yourself a “manualised” version by sitting the scope on a turntable. I have the slightly spurious desire to see a graduated scale on the mount movements. I’m used to using research grade optical equipment and whilst the optics have that feel about them the mount, although functional, does not.

The telescope comes with TheSkyX (First Light edition) planetarium software, and also an application called “NexRemote” which seems to allow you to control the telescope using a virtual version of the handset on screen – this seems a bit pointless to me! Other telescope control software is available, and it appears there is an interface standard. The programmer in me is hankering to write my own controller software!

Overall I’m pleased with my new purchase but desperate for a slightly less cloudy night to try it out properly – no doubt more blog posts to follow once I’ve done this! Even at £650 for the telescope it is cheaper than many lenses for my Canon SLR, although it is a little chastening that John Hadley’s 1721 reflecting telescope had a larger primary mirror.

Update:

After a few weeks of twilight use I thought it might be useful to add a couple of further comments which don’t really make a full new blog post:

1. You can get and set the telescope azimuth and altitude directly using the appropriate entries in the Utilities menu, without alignment these values are based on an assumed initial position of 0,0. During the hours of daylight, when only a very limited number of celestial bodies may be visible, you can carry out a “single body” alignment using the “Solar System Align” option in Alignment. This allows you to enable tracking, and to Goto specified absolute coordinates – useful if you want to survey heights of neighbouring obstructions.

2. The 5SE does not support autoguiding whilst the 6SE and 8SE do. The NexStar range does seem a bit confusing in terms of the facilities available across the range, the 5SE for another example is the only one to have a built-in equatorial wedge.

Here is a video tour, which covers much of what I’ve written above but includes the sound of me tripping over the cat’s water bowl: