Category: Technology

Programming, gadgets (reviews thereof) and computers

Photographs, videos and GPS

02 February WestendorfThis post is in part a memory aid but it may be interesting to other amateur photographers, and organisational obsessives.

My scheme for holidays and walks out is to take cameras (Canon 400D, Casio Exilim EX-S10), sometimes a video camera (Canon Legaria FS200) and a Garmin GPS 60 which I use to provide information for geotagging photos rather than navigation, although I once used it as an altimeter to find the top of a cloud covered Lake District mountain. Geotagging is the process of labelling a camera image with the location at which it was taken.

I save images as JPEG, I should probably use RAW format on the SLR but the workflow is more complicated and I rarely do anything particularly advanced with images after I’ve taken them other than cropping, straightening and a little fiddling with contrast. Once home I save all the images from a trip to a directory whose name is as follows:

Z:\My Pictures\[year]\[sequence number] – [description] – [date]

So for my recent skiing trip:

Z:\My Pictures\2011\003 – Hinterglemm – 29jan11

I leave the image file names unaltered. Padding the sequence number with zeroes helps with sorting. The idea of this is that I can easily find photos of a particular trip just using the “natural” ordering of the file system, I don’t rely on 3rd party software and I’m fairly safe from the file system playing sneaky tricks with creation dates. The Z: drive on my system is network attached storage, so it can be accessed from both my desktop and laptop computers. I back this up to the D: drive on my desktop PC using Syncback and I also copy it periodically to a portable drive which I keep at work. Syncback synchronises the files in two directories, I use this in preference to “proper” backup because it doesn’t leave my files in a big blob of an opaque backup format (I got burnt by this when using NTbackup in the past). The drawback is that I can’t go back to a snapshot in time but I’ve never felt the need to do this.

In addition to the images, I also save the GPS file in GPX format to the directory, this is downloaded and converted using Mapsource which is Garmin’s interfacing software. GPX is a format based on XML so is easy to read programmatically and even by humans. I do little inside Mapsource other than converting, and for a multi-session trip, stitching all the tracks together into a single file. Another handy tool in this area is GPSBabel which converts GPS data between a multitude of formats.

I use Picasa for photo viewing and labelling: it’s free, it has basic editing functions, it allows labelling and geotagging of photos in a fairly open manner and it does interesting stuff like face recognition too. As well as all this it links to Google’s web albums, so I can share photos, and it talks nicely to Google Earth.

Both geotagging and labelling images use EXIF (Exchangeable image file format) this is a way of adding metadata to images; nice because it’s a standard and the data goes in the image file so can’t get lost. EXIFtool is a very useful command-line tool for reading and writing EXIF data, and it can be integrated into your own programs. Software like Picasa, and websites such as Flickr are EXIF aware so data saved in this format can be visible in a range of applications.

It is possible to geotag photos manually with Picasa via Google Earth but I’ve collected a GPS track so this is not necessary. There are free software packages to do this but I’ve written my own for fun. The process is fairly simple: the GPS track has a timestamp associated with each location point and the photos from the camera each have a timestamp. All the geotagging software has to do is find the GPS point with the timestamp closest to that of the photo and write that location data to the image file in the appropriate EXIF fashion. The only real difficulty is matching up the offset between image time and GPS time – for this I take a picture of my GPS which shows what time it thinks it is and label this “GPS”.

In fact I usually label photos after they have been geotagged: photos can be exported from Picasa as a Google Earth compatible KMZ file and then upload into Google Earth along with the GPS track in GPX format making it possible to see where you were when you took the photo, which makes labelling easier.

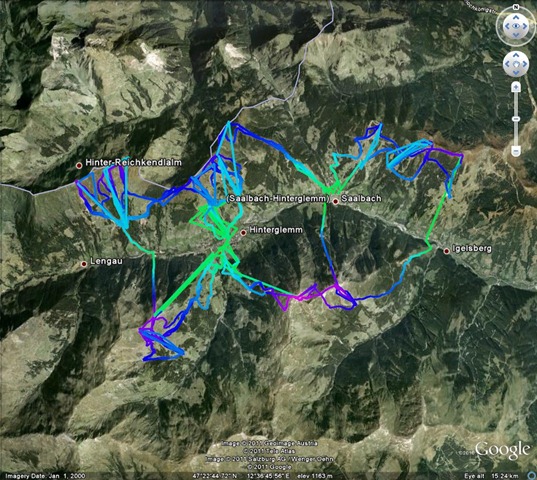
I use www.gpsvizualiser.com to create images of GPS tracks on top of satellite images, this is a bit more flexible than just using Google Earth, I must admit to being a bit bewildered with the range of options available here. Below is an example where height is coded with colour.

GPSTrackHinterglemm

As I go around I sometimes take sets of images to make a panorama. The final step is to stitch together these multiple images to make single, panoramic views, I now use Microsoft Image Composite Editor to do this, it preserves the EXIF data of the input image and does a nice auto-crop. My geotagging program flags up images that were taken close together in time as prospective panoramic images. The image below is a simple to image panoramic view (from Hinterglemm)

Panorama towards Schattberg West from below Schattberg Ost

I mentioned video in the title: at the moment I’m still a little bemused by video. I use the same directory structure for storing videos as I do for pictures but I haven’t found album software I’m happy with or a reliable way of labelling footage – Picasa seems promising although the playback quality is a bit poor. ffmpeg looks like a handy programming tool. Any suggestions welcome!

Kindle-ing

kindleAnother in an occasional series of gadget reviews, and more general thoughts on books. This time I look at the Amazon Kindle, my latest gadgety purchase – I have the WiFi only version with added leather carry case. The Kindle is an electronic device onto which books can be downloaded from a range of sources. In a sense the device is a side issue, Kindle software is available for smartphones (I have it on my HTC Desire), and computers. The main action for the Kindle is in the ecosystem: it makes it very easy to spend money on Amazon!

There are quite a few books available in the Kindle Store on Amazon, both free and paid. The paid offerings are a little cheaper than their paper equivalents but not hugely so. In addition PDF files can be read using the device, it will also play MP3 audio files. The Kindle Store also has links out to places where free content can be downloaded. For example, Project Gutenberg holds a wide variety of out of copyright material in a variety of e-book formats.

As long as you’re prepared to compromise a little you’ll not run short of things to read –  I’d like to read the Patrick O’Brian Aubrey-Maturin series but they are not yet available for download. Only three of the top ten Amazon bestsellers are available in Kindle format at the moment. So far I’ve bought “Trilobite!” by Richard Fortey and “22 days in May” by David Laws. I also have “Sustainable Energy – without the hot air” by David Mackay which I got as a free download, and converted to an appropriate format using Calibre e-book Management, this is available as a community conversion of the original HTML files. Books can be transferred to the Kindle by WiFi, or direct cable connection. Buying books is magically easy – press button, wait a minute and you’re done!

Compared to an HTC Desire the Kindle interface feels rather clunky, I kept wanting to change pages by touch! Having said this moving from page to page is ergonomically easy: there are a couple of handy page forward / page backward buttons suited to either handedness. Page changes feel ever so slightly ponderous with a bit of a flash as the page changes. The battery life is very good, the display is e-ink based and so static display takes no power, only switching pages requires power. The display size is about right and it is very nice to read from, when I first opened the device I assumed the picture on the screen was a piece of paper for display purposes. There are a range of options for adjusting text size, spacing and so forth, although I found some glitches with text size control.

The Kindle is ideal for plain text, however for text with diagrams it is a bit hit-and-miss, although the quality of the display is good enough to show quite detailed greyscale images in the case of the Fortey book these have simply not been included by the publisher. The Mackay book includes figures but the placement of the figures in the text has largely been done automatically and is a bit wobbly. I’d really like to try a book with illustrations which have been done properly – any recommendations then please comment.

The benefit of the Kindle with non-fiction is that searching, bookmarking, and highlighting are all relatively straightforward. I have religious objections against making marks in paper books – I think as a result of using the library as a child. It’s also possible to add notes to a book and to see the “favourite” notes of others.

The problem is the Kindle misses the display aspects of book owning and reading; my house is full of books collected over 20 years. They are my extended phenotype; they tell you something about me. If you visit my house you can see my books – you might want to borrow one. The Kindle cuts this away, you can’t see what is on my Kindle, and if even if you could, you couldn’t borrow it. I’ve tried to replicate the bookshelf aspect in my Shelfari account, where you can see what I am reading and what I have read. I’m also missing the pile of books beside my bed. I’m an old-fashioned animal that misses physical objects.

Overall: not at all bad, reading raw text is comfortable, the whole buying new text is frighteningly easy, and a range of formats can be read. I’m looking forward to using the Kindle to avoid my mortal holiday fear – that I might run out of things to read!

Sunlight

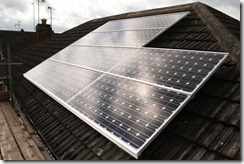
IMG_6875 Some time ago we installed “solar thermal” on our roof, as described in: “The Dorothy Hopkinson Memorial Solar Panel”. This heats water, it’s significantly reduced our gas usage over the summer when the central heating is not on but during the winter when most of our gas is consumed the effect is minimal.

Next step on the renewable energy list is solar photovoltaic (PV) – this converts light to electricity directly. Solar PV systems are rather more expensive than solar thermal systems, until recently the economics of this were a bit questionable – £10,000 is a lot to spend to reduce your electricity consumption by half. However, the feed-in tariff scheme was introduced in the UK in April 2010. This scheme pays a generous tariff based on the total amount of renewable electricity generated by an installation in an effort to increase the uptake of such systems. A similar scheme has been in place in Germany since 2000, where it has been pretty successful in reaching this goal.

We have a medium-sized 3 bed semi-detached house with East-West facing roof elements which are relatively small. Two of us live in the house, our annual electricity consumption is typically 6.5 kWh  per day or 2400kWh per year (*see below for a comment on units). When we first moved into the house our consumption was around 11kWh per day (4000kWh per year). We reduced this by replacing all our light bulbs with low energy versions; switching off a second fridge/freezer; almost entirely stopping using a tumble drier and on replacing fridges and washing machines we bought the lowest energy versions we could find. So these measure achieved roughly 40% reduction. I know all this because I’ve been recording our electricity and gas consumption once a week for the last 3 years!

A colleague at work has recently installed both solar thermal and solar PV, and he gave a talk describing his experiences. After some delay we arranged for a survey by The Green Electrician, who were the installers recommended locally by Segen. The surveyor did a few measurements of our roof and then went through sample power generation calculations and costings based on those measurements. The calculation is described in “The Government’s Standard Assessment Procedure for Energy Rating of Dwellings” (SAP 2005 page 69). Beforehand I was under the impression that this wasn’t going to be worthwhile since only our East-facing roof is available for installation and this is always described as ‘non-ideal’. However, the calculations show that the penalty for an East-facing roof compared to a south-facing one is only about 15%. Unlike solar thermal, direct sunlight is not required – useful energy is still generated on a cloudy day or when the panel is in shadow.

Slight diversion: we were original quoted for an 8 panel system, however once on the roof the installers found they could fit two more panels. I’ve redone the calculations to allow for this – they may be a little bit inaccurate but not much.

The system recommended was a 1.85kWp Suntech system (ten 1580 x 808mm panels = 12.64m2) limited by the size of our roof. The calculated output of this system is 1393kWh per year i.e. about 60% of our annual usage. The price quoted for this system is ~£8,600 (excluding cost of scaffolding which was just over £400). The feed-in tariff is £575 per year based on 1393kwH per year production at a price of 41.3p per kWh. The savings on our electricity bill should be £98 per year (based on 50% of generated electricity being used by us at 14p per Kwh) and £21 based on selling the other 50% back to the grid at 3p per kWh. The feed-in tariff is inflation linked, and it’s reasonable to assume that the buy and sell prices of electricity will go up in the future. As you can see the feed-in tariff is what makes this financially sensible. In theory we will be getting £694 back on the system every year, so it will pay for itself in 13 years or less, mainly due to the feed-in tariff. The tariff is paid for 25 years so at the end of 25 years we will have been “re-paid” at least £8350 more than we spent. This is an embarrassingly high “middle-class benefit”. There are companies who will install renewable systems, paying the upfront costs, providing significantly cheaper electricity and taking the tariff (see Guardian article here): in summary this could work for you but the companies aren’t doing you a favour.

Installation is pretty straightforward: we needed substantial scaffolding across the front of the house to provide roof access; there’s some electrical gear to go in the loft (this is a panel about 1m2) and there’s a cable run from there down to our consumer unit under the stairs where there is a further small meter the size of a central heating controller. In our house this is fairly straightforward: the cable runs up to the loft via ducting up the stairwell – we’ll bury this in the wall when we next decorate. Three chaps were working for a substantial fraction of two days but they also cleaned out my gutter and re-pointed the ridge-tiles. At this point I’d like to commend Ian, Danny and John: the installers, who did a fine job and were most polite.  

There’s still some paperwork for us to do, but essentially the power companies are obliged to pay the feed-in tariff and accept energy back from us onto the grid.

At the moment I’m going up and down the loft stairs to look at my power generation at 30 minute intervals! Overall I’m very pleased with the system: survey to installation was a day under 3 weeks and on a not particularly sunny day I’ve been generating 1000W since 10:30am and peaked at around 1500W. As of 3pm I’ve generated 4.4Kwh which is nearly 70% of our average daily usage. We expect to get less electricity from the system as we head into the shorter days of winter with a sun lower in the sky, but it’s not a bad start.

As an additional bonus we can now electrocute unsuspecting electricians in a sustainable fashion – unlike a normal house you need to switch off supply from the grid and from the solar panel before sticking your screwdriver anywhere electrical. There are big signs to this effect next to the consumer unit.

*Note on units: Power is the rate at which something consumes energy, and the units for this are Watts (W), 1000 Watts is known as 1kiloWatt (kW) – a kettle uses about 2kW when it is running, the PC I’m using about 300W and the electric shower about 9kW. Ultimately what you buy from the electricity company is an amount of energy. For domestic electricity consumption we talk about “kWh” or “kilowatt-hours” this is a power multiplied by a time which in physical terms is “energy” which physicists would normally quote in units of “Joules” however, we’re not in physics at the moment. The quoted output of our system is in “kWp” or “Kilowatt-hours (peak)” – this is the maximum power we could possibly obtain from the system.


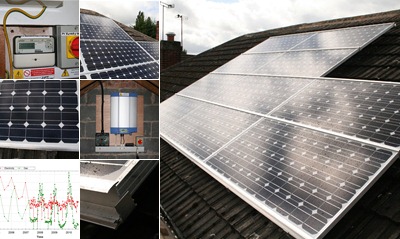
Some pictures of the system, including a graph of gas and electricity consumption over the last three years.

Bamboo Pen and Touch

This is a tiny technology review. I recently bought a Wacom Bamboo Pen and Touch tablet, I say recently – I picked it up from the post office a little over 2 hours ago!

I used a Wacom tablet extensively as a mouse replacement at work some years back, and rather liked it. I only gave up because I moved into industry from academia and they are a bit more fussy about what I attach to the PC with which I am provided. At home the pen interface didn’t work quite so well because at the time I was quite keen on computer games, first-person shooters in particular, and controlling the little man in such a game using a pen is exceedingly challenging, to say the least.

The big benefit of a pen interface to my mind is that I can hold the pen whilst typing, then when I need to do some “mousing” I don’t have to scrabble around for the mouse. The whole process is just much smoother.

Unlike my original Wacom tablet this model will accept both pen and touch (with your fingers) input – I must admit I’m not really anticipating using the touch input. It appears to support the range of multi-touch gestures that a smartphone will accept. The active area of the tablet is roughly journalists notepad size which makes it small for an artist type tablet.

In terms of software, the installation attempts to guide you into some spoken tutorials which treat you like a moron – praising fulsomely your every successful pen-stroke. None of this is actually necessary since using a pen is largely intuitive and all you really need to learn is what the right-click simulation is (it’s the button on the body of the pen) and what the configurable buttons on the tablet do.

I have the tablet installed on a Windows 7 system, which is “ink” aware – it understands interacting via a pen: A little palette will pop out wherein the miracle of the “handwriting recognition” is performed – being able to read my scrawl is impressive but it’s a bit like a talking dog: it’s very clever but ultimately pointless on a computer with a keyboard. Office 2007 is also ink aware, you can open up a document and scribble on a separate layer – obviously the first thing I did was draw a big circle around something and wrote “bollocks” next to it.

The tablet also comes with some little mini-apps in which you can doodle and play games, you can also download more mini-apps. They don’t look fantastically useful.

All in all I think we’re going to be happy together – holding the pen feels just like old times!

A set of blog posts on SQL

This is a roundup post for a rather specialist set of posts I wrote on SQL (Structured Query Language), a computer language for creating and querying databases. Basically the posts are my notes on the language which I’m learning because a couple of programming projects I have in mind will need it. The main source for these notes is the Head First SQL book. I’ve used a another book in this series (Head First Design Patterns) – I quite like the presentational style. The code in the posts is formatted for display using this SQL to HTML formatter.

Topics covered:
Some notes on SQL: 1 – Creation
Some notes on SQL: 2 – Basic SELECT
Some notes on SQL: 3 – Changing a table
Some notes on SQL: 4 – Advanced SELECT
Some notes on SQL: 5 – Database design
Some notes on SQL: 6 – Multi-table operations
Some notes on SQL: 7 – Subqueries and views

Of course you can find SQL cheatsheets elsewhere.

The Head First SQL book also has material on transactions and security, if I get a renewed bout of enthusiasm I will add a post on these items.

I used MySQL via its command line client to do the exercises, because it’s about as straightforward as you can get. Notepad++ recognises SQL as a language and will do syntax highlighting, so I type my commands into it and copy them into the MySQL command line client. MySQL is pretty straightforward to install. I also installed Microsoft SQL Server Express 2008, which turned out to be a bit more of a struggle but on the plus side integration the C# .NET, which is what I normally program in, looks better than for MySQL.

I’ve been using with the SQL Server via SQL Management Studio (a graphical interface to databases) on the general election data compiled by The Guardian. First contact with actual data, as opposed to learning exercises has proved interesting! A lot of things that are fiddly to do in a spreadsheet are straightforward using  SQL.

SQL was designed in the early 1970’s, with commercial implementations appearing towards the end of the decade. It’s influence visible is visible in more modern languages, such as the LINQ extensions to C# (this influence is pretty explicitly stated). Some of the ideas of database design (normalisation) seem relevant to object-oriented programming.

It’s been an interesting learning experience, my scientific background in programming has me stuffing pretty much any sort of data into an array in the first instance. SQL and a database look like a much better solution for many situations.